OS Command Injection is a critical web security vulnerability that allows attackers to execute arbitrary operating system commands on the server hosting a vulnerable application. In this blog, we’ll walk through how attackers exploit unsanitized user input via HTML forms, and how different defensive techniques behave — from basic to advanced.
We’ll explore three real Flask application scenarios:
- No input validation (fully vulnerable)
- Partial validation using
shlex - Hardened validation using regex blocking all execution patterns
- Final thoughts on best practices
In this blog, we will demonstrate how OS command injection can occur through a simple web form using a vulnerable Python Flask application. The demo app consists of two main pages:
- A member registration page (/) where users can input their name to register
- A member listing page (/member) that displays the list of all registered usernames
📥 Download the source code used in this demo at:
📌How It Works
- When a user submits their username through the registration form, the application writes the input directly into a file named user_list.txt located in the app directory. Depending on how this write operation is handled (securely or insecurely), it becomes possible for attackers to inject and execute arbitrary OS commands.
- Throughout this blog, we’ll use three versions of this same app to illustrate various security levels — from completely vulnerable to hardened input validation.
Part 1: OS Command Injection via Form Input Without Input Validation
In this vulnerable version, the Flask web app allows users to “register” by entering their name in a form. However, since the application uses os.system() to echo user input into a file, it opens up the risk of shell command execution if attackers submit specially crafted input.
🔥 Vulnerable Code Snippet:
if request.method == "POST":
        name = request.form.get("name", "").strip()
        if name:
       	 os.system(f'echo {name} >> {LIST_FILE}')
	return redirect("/member")
▶️ Step-by-Step Exploit Guide:
1. Launch the vulnerable version of the app using the command below:
# python3 -m flask --app app_no_secure.py run --host=0.0.0.02. Access the member registration form at:
http://<YOUR_SERVER_IP>:5000
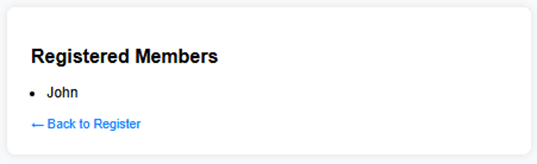
3. Enter a normal username such as John and click the “Register” button.
– The application will redirect you to /member, where the submitted name is displayed in the registered member list — showing that the input was successfully saved.

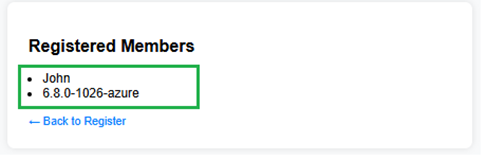
4. Now, go back to the registration form and enter a crafted payload like:
$(uname -r)
- Since this version of the application writes the input using the
os.system()function:
os.system(f"echo {name} >> user_list.txt")Flask will pass the entire string to the shell, causing the command uname -r to be executed on the server. The output of the command (e.g., the Linux kernel version) will be written into user_list.txt.
➡️ As a result, when visiting /member, you’ll see the actual OS-level command output instead of a regular username — confirming a successful command injection.
Part 2: Using shlex to Parse Input and Detect Shell Commands – But Still Bypassable
To improve security, we use the shlex module to tokenize the input similar to how a shell would interpret it. This helps identify common dangerous shell commands like ls, id, rm, etc…
🔐 How the Improved App Works
– In this version, the input is processed as follows:
import shlex

tokens = shlex.split(name)
if any(cmd in token for cmd in blacklist_commands):
    block()
– The app checks whether any known command appears in the user input. If found, the submission is blocked. This helps block payloads like:
$(ls -al)
$(id)
$(cat /etc/passwd)
1. Run the Level 1 secure version of the app using the command below:
# python3 -m flask --app app_secure_1.py run --host=0.0.0.0This version includes basic input validation by checking for dangerous command keywords using shlex.split().
2. Access the member registration form and nnter a malicious payload in the username field such as:
$(uname -r)
3. The app will block the registration process and display a warning message such as:

The input is not written to the user_list.txt file

=> The command is not executed on the server, proving that this level of validation is effective against direct command injection attempts.
🕵️ But What If the Attacker Tries a Different Approach?
- Blocking direct shell commands like $(uname -r) is an important first step — and using shlex is a smart lightweight solution for that. However, a skilled attacker won’t stop there.
- When direct execution is blocked, attackers often shift to stealthier techniques — such as encoding their payloads in base64 to bypass token-based filtering. Since the server will still pass the input to the shell via os.system(), anything that evaluates to a valid shell command at runtime can still be executed.
- In the next steps, we’ll test how the current application version responds when the attacker submits an obfuscated payload using base64 decoding to hide a dangerous OS command — and whether this basic filter is enough to stop it.


💥 Example Payload:
$($(echo dW5hbWUgLXIK | base64 -d))📌 Breakdown of This Payload:
- dW5hbWUgLXIK is the Base64-encoded string of the command uname -r
- echo dW5hbWUgLXIK | base64 -d will decode it to: uname -r
- The entire expression is wrapped in $(…), so:
- $(…) runs the base64 decoding
- Then another $(…) executes the result, which becomes:
- $(uname -r)
⚠️ Result on the Server:
Even though shlex.split() may parse this input into harmless-looking tokens like:
['$($(echo', 'dW5hbWUgLXIK', '|', 'base64', '-d))']– It doesn’t recognize that after decoding, a real OS command will be injected and executed.
🧪 What Happens:
– The app writes the string via os.system():
os.system(f"echo {name} >> user_list.txt")– The shell expands and executes the payload:
echo $($(echo dW5hbWUgLXIK | base64 -d)) >> user_list.txt– This becomes:
echo $(uname -r) >> user_list.txt➡️ The actual kernel version of the server is written to user_list.txt — again proving the app is still vulnerable to OS command injection.
Part 3: Hardened Defense with Regex – Block All Forms of Execution Patterns
While using shlex provides a lightweight mechanism to catch known OS command tokens, it still falls short against more advanced evasion techniques. Attackers can easily bypass such filters by wrapping dangerous commands inside shell expressions, obfuscating them with base64, or nesting payloads using shell constructs like $(…) or `…`.
To address these shortcomings, the next iteration of the application implements a hardened defense strategy using regular expressions (regex). This version doesn’t just block specific commands — it proactively detects and blocks dangerous execution patterns, including:
- Shell substitution: $(…)
- Command substitution: `…`
- Base64 decode pipelines: echo <payload> | base64 -d
- Nested payloads: $($(…)), $((1+1))
- Shell chaining: ;, &&, ||
– Launch the enhanced (regex-hardened) version of the application using the command below:
# python3 -m flask --app app_secure_2.py run --host=0.0.0.0– At this point, the app is equipped to block not only direct command injections, but also encoded payloads — such as those using base64 to hide OS commands.


Part 4: Conclusion: Practical Defense Against OS Command Injection
OS command injection is one of the most critical — and yet most preventable — vulnerabilities in modern web applications. As demonstrated in this blog, even a simple form input can become an attack vector if user data is passed unsanitized to shell commands.
🔐 Key Strategies to Prevent OS Shell Injection:
- Never pass raw user input into
os.system()orsubprocesswithshell=True - Use
subprocess.run([...], shell=False)with strict argument formatting - Avoid invoking shell unless absolutely necessary
- Validate and sanitize all user inputs — not just for content, but for intent
- Block execution syntax patterns like
$(...),`...`, and|,;,&&using regex or strict parsers - Encode and store input safely if logging is required
- Enforce input length, format, and character set constraints
- Least privilege principle: run your app under a restricted user, never as root
🧑💻 “Write code like attackers are watching… because they are.”
– TechNoStress Blog