📘Outbound access to the Internet is a common requirement in Azure for workloads such as:
- API-based microservices
- Web crawlers & scraping agents
- Software updates & package installations
- Communication with SaaS services
Azure provides several methods for enabling outbound access. However, each method has different implications regarding:
- SNAT (Source Network Address Translation) port allocation
- Scalability
- Security
- Cost and IP management
In this training document, we’ll explore each option, compare them in a technical context, and provide a step-by-step deployment of a hybrid Azure Firewall + NAT Gateway model—secure, scalable, and production-ready.

🔄 Outbound Access Methods in Azure:
1. Public IP Directly on VM
- Each VM NIC is assigned a public IP.
- Azure handles SNAT using that IP.
Limitations:
- Consumes public IPs linearly (1 per VM).
- Public exposure risk.
- Not suitable for central IP management or FQDN filtering.
2. Default Outbound Access
- VMs in a subnet without NAT Gateway, Public IP, or LB will use Azure-managed SNAT.
- Being deprecated in Sept 2025.
Technical Limitations:
- Very low SNAT port pool (~1024 ports/VM NIC).
- No guaranteed public IP (not static).
- Not reliable for production.
3. Azure Load Balancer with Outbound NAT Rules
Azure Standard Load Balancer can provide outbound connectivity via NAT Outbound Rules.
🔍How SNAT Works Here:
- SNAT ports are statically pre-allocated per VM NIC.
- For Standard SKU: ~1024 SNAT ports per backend NIC (not shared).
- SNAT exhaustion occurs per-NIC, not dynamically reallocated.
Limitations:
- Fixed allocation: One VM may have unused ports, while others may be exhausted.
- No dynamic scaling of SNAT ports.
- Management overhead of load balancer when only outbound is needed.
- No FQDN filtering or outbound domain control.
4. Azure NAT Gateway (Recommended)
🌐Architecture:
- Attach to one or more subnets.
- Associate 1–16 public IPs or an IP Prefix.
- All outbound traffic from the subnet routes through NAT Gateway.
🔧 SNAT Port Behavior:
- 64,512 SNAT ports per Public IP.
- First-In-First-Out (FIFO) dynamic allocation.
- Shared pool across all VMs in subnet.
- If a VM exhausts its active ports, least recently used ports are recycled.
✅ Advantages:
- Scalable and performant.
- Cost-effective at scale.
- Static public IPs for whitelisting.
- Works seamlessly with Azure Firewall via UDR chaining
🗺️Demo: Secure Outbound Internet Access with NAT Gateway + Azure Firewall
📌 Objective
Build a secure outbound internet access solution where:
- A VM (without public IP) accesses the internet.
- Outbound traffic is routed through Azure Firewall, where FQDN-based filtering is applied.
- SNAT is handled efficiently by Azure NAT Gateway attached to the firewall subnet
📘Reference Architecture

✅ Step 1: Create the Virtual Network and Subnets
1.1 Create the VNet
Go to the Azure Portal > Search “Virtual networks” > Click + Create.
Fill in the basics:
- Name:
demo-vnet - Region: e.g.,
East US

Proceed to the IP Addresses tab
- IPv4 address space:
10.10.0.0/16
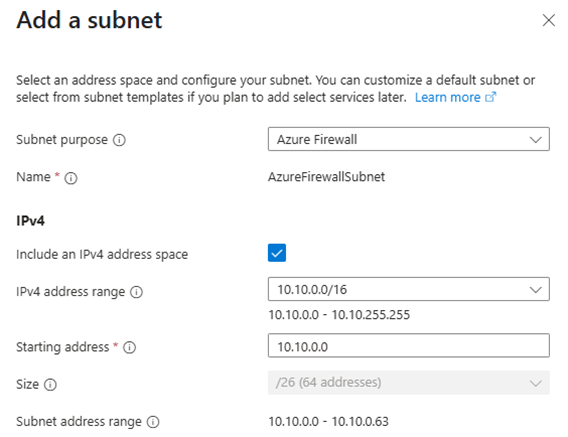
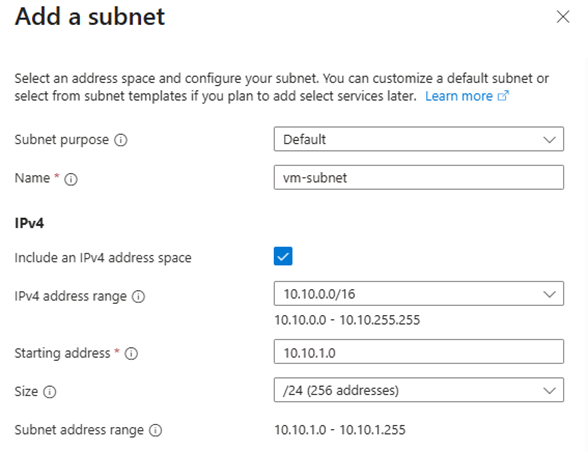
- Add the following subnets:

⚠️ Azure Firewall requires the subnet to be named AzureFirewallSubnet
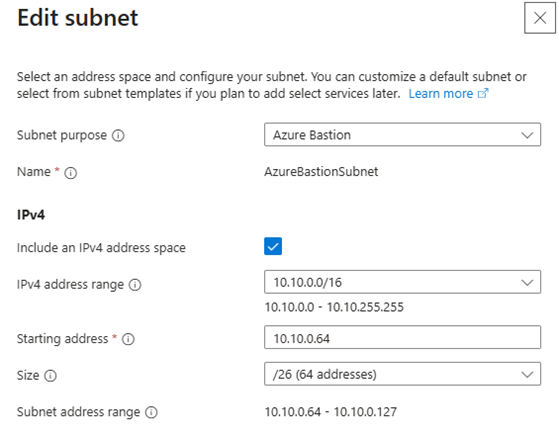
⚠️ Azure Bastion requires the subnet to be named AzureBastionSubnet and purpose must be set to Azure Bastion
⚠️ AzureFirewallManagementSubnet is required if you enable forced tunneling. Azure will not let you deploy the firewall unless this subnet exists.

Click Review + Create → Create
✅ Step 2: Deploy Azure NAT Gateway
Go to NAT gateways → + Create

Configuration:
- Name:
nat-gw-demo - Region: same as
demo-vnet - Public IPs: Select
nat-pip - Virtual Network: demo-vnet
- Subnet Association: Select only
AzureFirewallSubnet
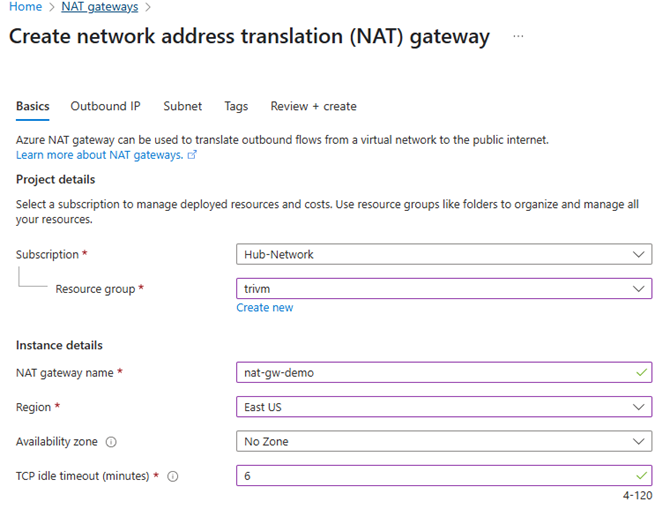

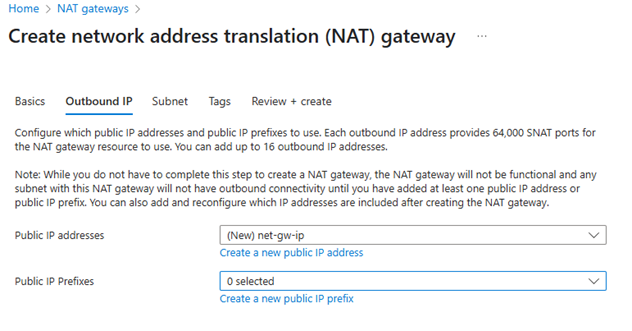

Click Review + Create → Create
NAT Gateway is now ready to provide high-scale SNAT (64,512 ports per IP) for outbound traffic from the firewall
✅ Step 3: Deploy Azure Firewall
Go to Firewalls → + Create
Settings:
- Name:
az-fw-demo - Region: match VNet
- Virtual Network:
demo-vnet - Subnet: Auto-selects
AzureFirewallSubnet - Public IP: Create new (used for management)
- Attach a new or existing Firewall Policy


Click Review + Create → Create
✅ Step 4: Enable DNS Proxy (Critical for FQDN filtering)
If you want to enable FQDN (fully qualified domain name) filtering in network rules, enable DNS proxy and update the virtual machine configuration to use the firewall as a DNS proxy.
- Go to the Firewall Policy → DNS Settings
- Enable DNS Proxy: ✅ Yes

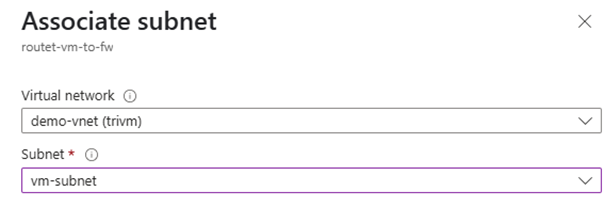
✅ Step 5: Create Route Tables
- Go to Route tables → + Create
- Name:
routet-vm-to-fw
- Associate to:
vm-subnet
- Add route:
- Name:
default-to-fw - Prefix:
0.0.0.0/0 - Next hop type: Virtual Appliance
- Next hop IP: Private IP of the Azure Firewall
- Name:


✅ Step 6: Deploy the Virtual Machine
– Go to Virtual Machines → + Create
– Basics + Networking::
- Name:
vm-demo - Region: match VNet
- Image: Ubuntu 22.04 or Windows Server
- Size: B2s or larger
- VNet:
demo-vnet - Subnet:
vm-subnet - Public IP: None

🔐 VM is now isolated in vm-subnet, all outbound access must go through Firewall + NAT Gateway.
✅ Step 7: Deploy Azure Bastion (Access VM securely)
- Go to Azure Bastion → + Create
- Settings:
- Name:
bastion-demo - Region: match VNet
- VNet:
demo-vnet - Subnet: Select
AzureBastionSubnet(must be /26) - Public IP: Create new
- Name:
- Click Review + Create → Create

✅ Bastion now allows secure, browser-based access to the VM over private IP
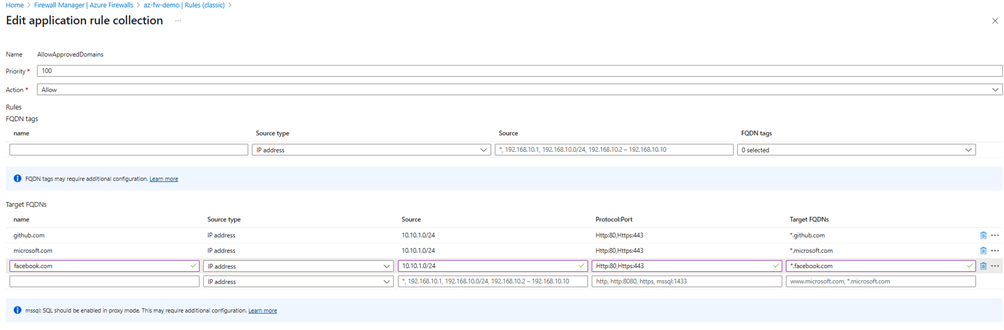
✅ Step 8: Configure Azure Firewall Application Rule
Go to Firewall Policy → Rules → + Add Application Rule Collection

Settings:
- Name:
AllowApprovedDomains - Priority: 100
- Rule Type: Application
- Source Type: IP address →
10.10.1.0/24(vm-subnet) - Protocols: HTTP, HTTPS
- Target FQDNs:
*.github.com*.microsoft.com- Action: Allow

✅ Step 9: Test the Setup (Windows VM via Microsoft Edge)
Once your VM is deployed and routed through Azure Firewall (with DNS Proxy and Application Rules configured), it’s time to test FQDN-based outbound filtering.
- Access the VM via Azure Bastion or RDP
- Open Microsoft Edge (pre-installed in Windows Server)
Try accessing:
✅ Allowed Domain
- Navigate to:
https://learn.microsoft.com - Expected Result: Page loads successfully
- Why:
*.microsoft.comis allowed in your Azure Firewall Application Rule

· Navigate to: https://facebook.com
· Expected Result: Page fails to load (e.g., ERR_CONNECTION_RESET or TLS error)
· Why: No Application Rule exists to allow traffic to facebook.com, so Azure Firewall blocks it by default

- Go to Azure Firewall Policy → Rules → Application Rule Collections
- Select your rule collection (e.g.,
AllowApprovedDomains) - Add Target FQDNs for *.facebook.com
🔁 Rule updates in Firewall Policy take effect within ~1-2 minute.
- Refresh or revisit
https://facebook.com > The page now loads successfully

📊Conclusion: Scalable Security Starts with Smart Outbound Design
In this guide, we built a secure, scalable, and cloud-native solution for outbound internet access using Azure Firewall and Azure NAT Gateway. Along the way, we:
✅ Explored multiple outbound connectivity options (Public IP, Load Balancer, Default SNAT, NAT Gateway)
✅ Understood the critical differences in SNAT port allocation and their impact on performance
✅ Designed and deployed a full architecture with:
- Private VM (no public IP)
- DNS Proxy-enabled Azure Firewall with FQDN filtering
- NAT Gateway for consistent and scalable outbound SNAT
- Azure Bastion for secure jumpbox access
✅ Tested real-world traffic flow with Edge browser and dynamic firewall rule updates
✅ Validated that NAT Gateway is actively handling SNAT instead of default Azure mechanisms
🔐 Most importantly, we learned how to centralize control, simplify IP management, and enforce application-layer security — all without compromising scalability.
🔥No public IP? No problem. Just NAT it like it’s hot.