In today’s cloud-powered world, API security isn’t just a checkbox—it’s the backbone of any robust digital platform. If you’ve ever worried about exposing your backend or struggled with complex authentication, you’re not alone. But what if you could combine enterprise-grade security, cloud-native scale, and developer agility—all in a single workflow?
Welcome to your hands-on journey! In this guide, you’ll not only deploy a Flask Weather API to Azure, but you’ll also discover how to lock it down with Azure API Management and Microsoft Entra ID. We’ll walk through real-world scenarios, step-by-step authentication, and proven troubleshooting tips—so you can build and launch APIs with confidence, not just hope.
Whether you’re an API newbie or a seasoned architect, this post will show you how to move beyond legacy keys and truly secure your cloud-native APIs for the future.
Ready to unleash the power of Azure? Let’s dive in!

🌐 Real-World Use Cases for Azure API Management
Before we get hands-on, here’s why APIM is the tool you want in your cloud toolbox:
- Secure Data Sharing: Publish internal APIs to partners, customers, or mobile apps—without exposing your backend to the wild west.
- Monetize Your APIs: Track usage, enforce quotas, and even set up billing tiers for third-party developers.
- Hybrid Integration: Seamlessly connect on-prem systems with Azure and beyond, via a secure, unified API gateway.
- Microservices Unification: Expose disparate microservices under one consistent API surface, with transformation policies and unified docs.
- Dev Portal Enablement: Instantly provide a self-service developer portal, API keys, documentation, and testing tools for your consumers.
🛠️ Key Features of Azure API Management That Make Life Easier
- Security: Out-of-the-box support for OAuth2, OpenID Connect, API key, and JWT validation—no custom code required.
- Policies: Apply request/response transformations, rate limiting, caching, IP filtering, and more with easy XML policy snippets.
- Analytics: Track every call, see usage patterns, diagnose errors, and understand what’s happening live.
- Versioning: Safely roll out new API versions and retire old ones without breaking consumers.
- Monitoring & Alerts: Integrate with Azure Monitor and Application Insights for detailed logging and proactive alerts.
▶️Step 1: Build, Containerize, and Deploy Your Flask Weather API to Azure
Let’s crank things up a notch: instead of running Flask locally, let’s containerize our Weather API and run it on Azure—using Azure Container Apps (or Azure Container Instances). This makes your API cloud-native, portable, and ready for integration with Azure API Management.
1.1 Sign Up and Get Your API Key for openweathermap.org
Head to https://openweathermap.org > Click the Sign In > Create an Account
Register a Free Account: Fill in your email, set a password, and confirm your email address via the link sent to your inbox.
Log In and Find Your API Key: Once inside, click on your user icon → “My API keys” or go directly to https://home.openweathermap.org/api_keys.
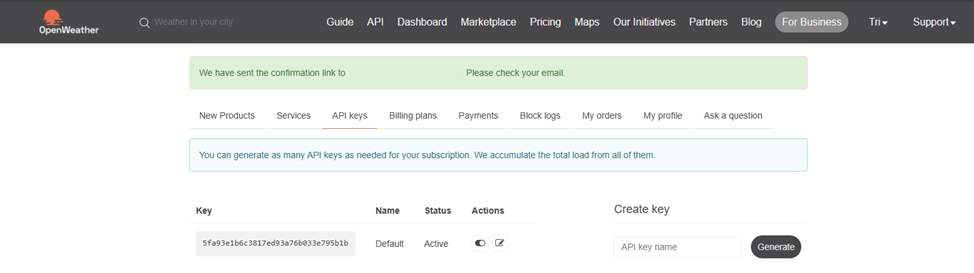
Copy Your Default API Key: You’ll see a long string—something like 8fdxxxxd113bxxxxxxxxxxxxxxxxxxxxxx. You can create a new key or use the default one provided.
1.2. Write Your Flask Weather API
# weather_api.py
import requests
from flask import Flask, request, jsonify

app = Flask(__name__)
API_KEY = "YOUR_OPENWEATHERMAP_API_KEY"

@app.route("/weather", methods=["GET"])
def get_weather():
    city = request.args.get("city", default="London")
    url = f"https://api.openweathermap.org/data/2.5/weather?q={city}&appid={API_KEY}&units=metric"
    resp = requests.get(url)
    data = resp.json()
    return jsonify({
        "city": city,
        "temperature": data["main"]["temp"],
        "description": data["weather"][0]["description"]
    })

if __name__ == "__main__":
    app.run(host="0.0.0.0", port=8080)
Replace the key in step 1.1 placeholder in your weather_api.py:
API_KEY = “your_actual_openweathermap_api_key_here”
Best practice:
Don’t hard-code sensitive keys in production code! For real-world projects, pass the API key via environment variables and read it using os.environ.get("API_KEY").
For quick demos or local dev, a hardcoded string is fine.
1.3. Create a Lightweight Dockerfile Expose Port 8080
Why Dockerize Your Flask App?
- Run your API anywhere: local, cloud, server, or CI/CD.
- Consistent environments—no more “it works on my machine!”
- Easier scaling and orchestration with platforms like Azure, Kubernetes, or Docker Compose.
➡️ Create requirements.txt
flask
requests
➡️ Write Your Dockerfile
# Step 1: Use an official, minimal Python image
FROM python:3.11-slim

# Step 2: Set the working directory in the container
WORKDIR /app

# Step 3: Copy requirements and install them
COPY requirements.txt requirements.txt
RUN pip install --no-cache-dir -r requirements.txt

# Step 4: Copy your entire application code into the container
COPY . .

# Step 5: Expose port 8080 (so Azure/your host can connect)
EXPOSE 8080

# Step 6: Run the app, making sure Flask listens on 0.0.0.0:8080
CMD ["python", "weather_api.py"]
Explanation:
- FROM python:3.11-slim: Uses a small, secure Python base image.
- WORKDIR /app: Makes
/appthe default directory inside your container. - COPY requirements.txt … & RUN pip install: Installs dependencies efficiently.
- COPY . .: Copies all your project files into the image.
- EXPOSE 8080: Tells Docker (and Azure) that your app will listen on port 8080.
- CMD …: Starts your Flask app.
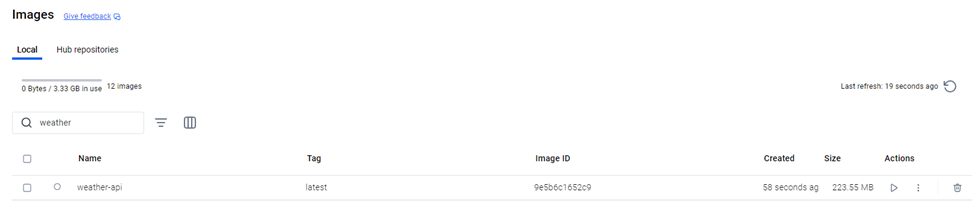
➡️ Build Your Docker Image
In your terminal, from the directory containing your Dockerfile:
docker build -t weather-api:latest .
1.4. Push Your Docker Image to Azure Container Registry (ACR)
Why Push to Azure Container Registry?
Think of Azure Container Registry as your team’s private “Docker Hub” in the cloud. It’s secure, fast, and integrated with Azure—perfect for storing images you want to deploy straight to Azure services.
No more “it only exists on my laptop!”
Once your image is in ACR, you can easily deploy it to Azure Container Apps, Azure Kubernetes Service, Azure App Service, and more.
➡️ Create an Azure Container Registry (if you don’t have one yet)
az acr create --resource-group myResourceGroup --name labacr01 --sku Basic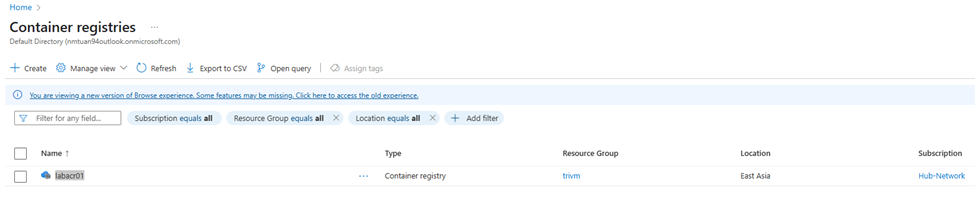
➡️ Log In to Your Registry
az acr login --name myweatheracr
➡️ Tag Your Local Docker Image for ACR
Docker images need a special name format before you can push them to ACR:<acr-login-server>/<image-name>:<tag>
Find your ACR login server (usually looks like <acr name>.azurecr.io):
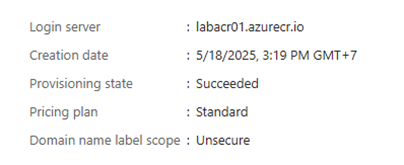
docker tag weather-api:latest labacr01.azurecr.io/weather-api:latest➡️ Push Your Image to ACR
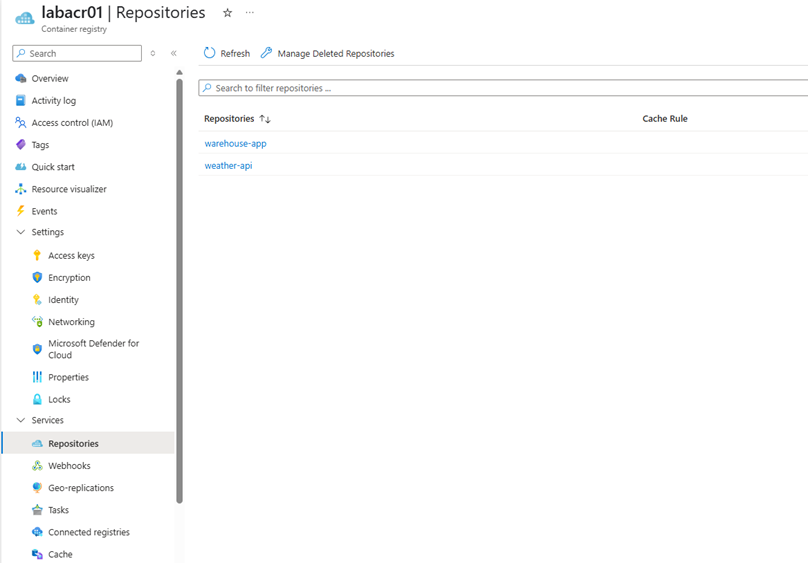
docker push labacr01.azurecr.io/weather-api:latest➡️ Verify the Image Exists in Azure
az acr repository list --name labacr01 --output table
1.5. Deploy Your Docker Image to Azure Container Apps Using the Azure Portal
Why Azure Container Apps?
Azure Container Apps is a serverless platform that lets you run your containerized apps at any scale—without worrying about virtual machines, Kubernetes clusters, or infrastructure headaches.
You focus on your code and API, Azure takes care of the rest!
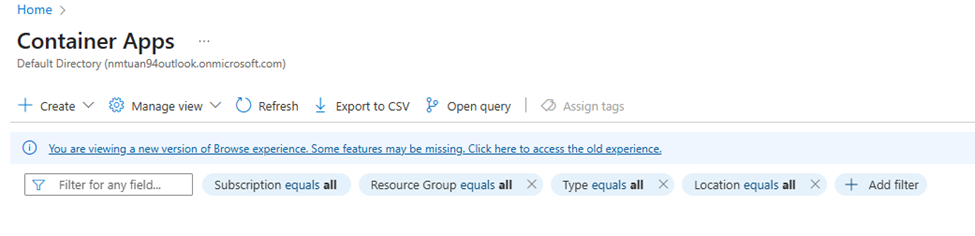
➡️ Open the Azure Portal > In the search bar, type “Container Apps” and click Container Apps.
➡️ Click + Create.
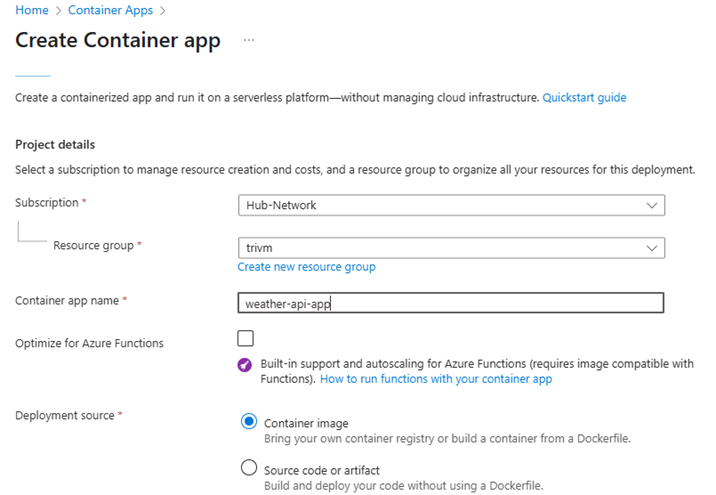
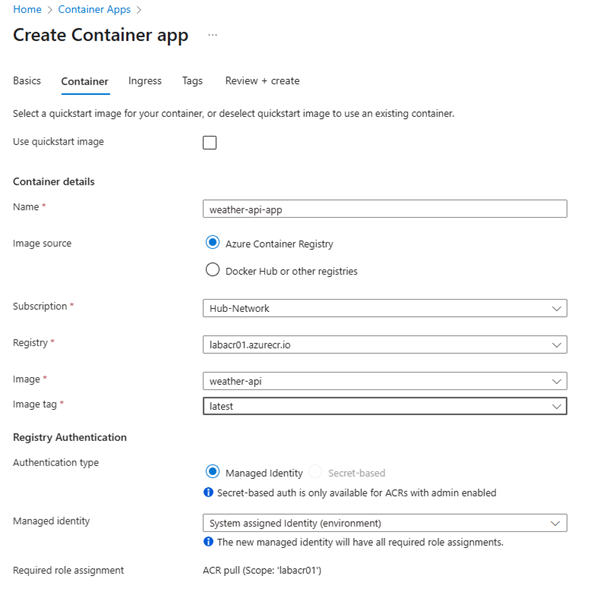
➡️ Configure Your Container: On the Container tab
- For Image source, choose Azure Container Registry.
- Pick your registry (e.g.,labacr01).
- For Image and tag, enter weather-api:latest.
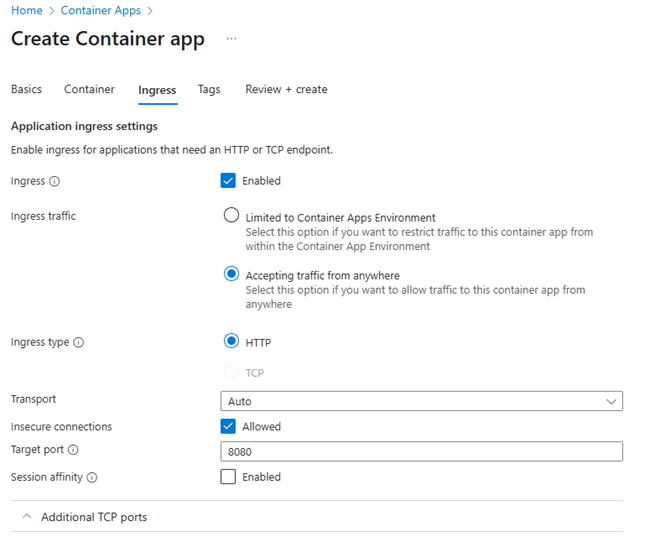
➡️ Configure Networking: On the Ingress tab:
- Enable ingress (yes!).
- Choose Accepting traffic from anywhere so the app is publicly accessible.
- Confirm the port is set to 8080.
➡️ Review + Create
Azure will now spin up your app—this can take 2–5 minutes. Sit tight!
1.6. Test Your Weather API Running on Azure Container Apps
➡️ Find Your Application URL:
In the Azure Portal, navigate to your Container App resource > On the Overview page, look for Application URL.
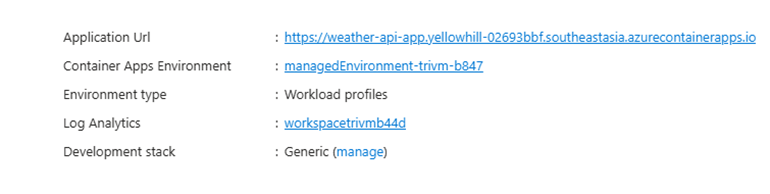
➡️ Test With Your Browser
Open your browser > Go to https://<your-app-url>:8080/weather?city=London

Why do you access your app with https (port 443) instead of port 8080?
When you deploy to Azure Container Apps, your Flask app runs inside the container on port 8080, but Azure automatically maps this to the standard secure web port (443) for you.
So when users open your app URL in the browser, Azure receives the request on port 443 (HTTPS), then forwards it to your app inside the container.
Result: You get a normal, secure web address—no need to type any special port!
▶️Step 2: Route and Secure Your Weather API with Azure API Management
Now that your Flask Weather API is running on Azure Container Apps, let’s make it secure, manageable, and enterprise-ready by putting it behind Azure API Management (APIM).
We’ll walk through spinning up a new APIM service, routing requests to your API, and enabling token-based authentication with Microsoft Entra ID.
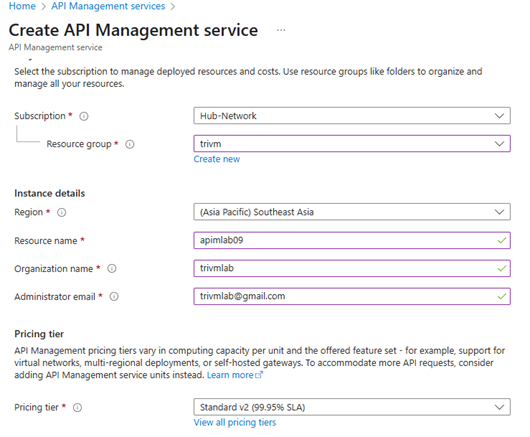
2.1. Create a New Azure API Management Service
- Go to the Azure Portal.
- Search for API Management services in the top search bar.

- Click + Create.
- On the Basics tab:
- Subscription: Choose your Azure subscription.
- Resource Group: Select or create a resource group.
- Region: Choose a region close to your users.
- Name: Enter a unique name, e.g.
myweatherapim. - Organization name and Admin email: Fill in as needed.
- Pricing tier: For demo/testing, choose Developer (no SLA).
- Click Review + create and then Create.
2.2. Route APIM to Your Weather API on Azure Container Apps
➡️Add Your Weather API as a Backend in APIM
- In the Azure Portal, go to your API Management service (
apimlab09).
- In the left menu, select APIs > APIs.
- Click + Add API > HTTP.
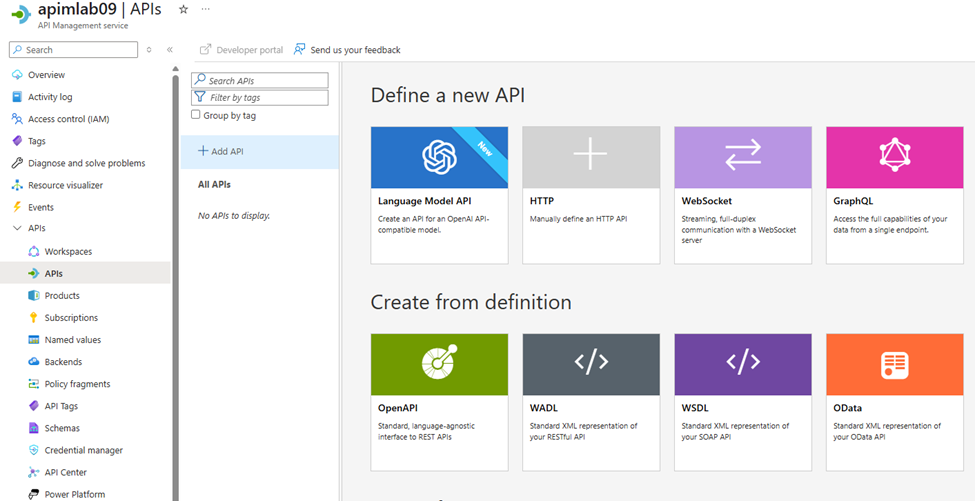
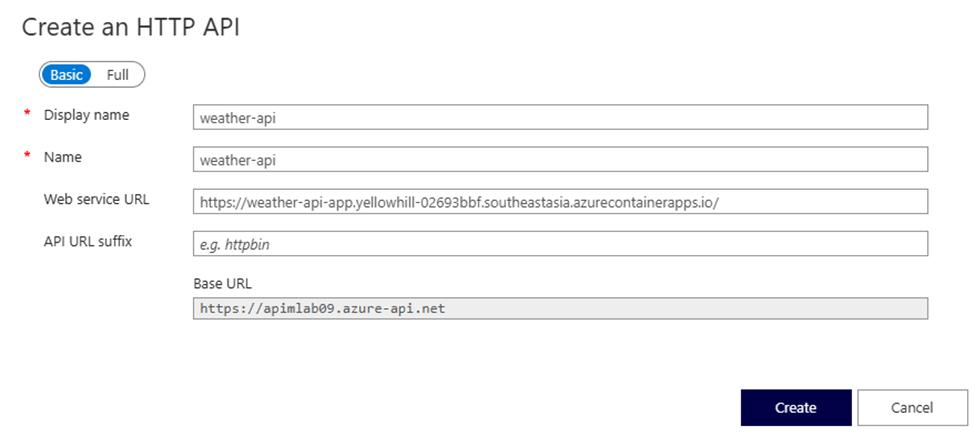
Display name: Weather API
Name: weather-api
Web service URL: (Use the public URL from your Azure Container App.)
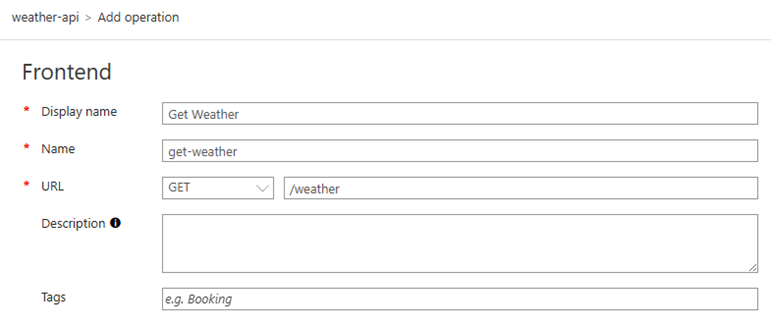
➡️Define the /weather Operation
Click on your new Weather API.

Select + Add Operation.
Set:
- Display name: Get Weather
- Name: get-weather
- URL: /weather
- Method: GET
Click Save.
2.3. Test Access to Your API via APIM Before Authentication
Before locking down your API with Entra ID, let’s make sure Azure API Management (APIM) is correctly routing traffic to your Weather API running on Azure Container Apps.
By default, APIM requires a subscription key in every request—even if authentication isn’t enabled yet. Here’s how to test your API at this stage.
➡️Find Your Subscription Key
- In the Azure Portal, navigate to your API Management instance.
- In the left menu, click Subscriptions.
- Click Show/Hide keys

➡️ Get Your APIM Gateway URL
- In the Azure Portal, go to your API Management service.
- Find the “Gateway URL” or the base URL, typically like:
https://<your-apim-name>.azure-api.net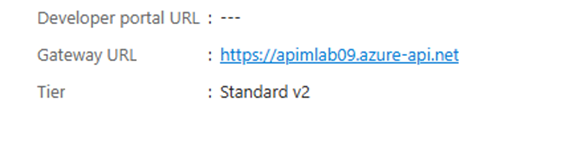
➡️Make a Test Request to Your Weather API
- You can test right in the APIM portal’s Test tab, or use curl/Postman.
- Try the following (replace values as needed):
curl "https://<your-apim-name>.azure-api.net/weather?city=Hanoi" \
-H "Ocp-Apim-Subscription-Key: <your-subscription-key>"- If everything’s set up correctly, you’ll get a weather JSON response from your backend Container App

▶️Step 3: Secure Your API with Microsoft Entra ID (Azure AD) Token Authentication
What is Microsoft Entra ID Token Authentication?
Microsoft Entra ID (formerly Azure Active Directory) token authentication means your API only accepts requests from users or applications that have been authenticated by your organization’s secure identity provider. Instead of relying on secret keys, basic authentication, or “security through obscurity,” you’re leveraging robust, industry-standard OAuth2 and OpenID Connect protocols.
When a client wants to call your API, it must first “log in” (programmatically or through a user flow) and obtain a Bearer token (a digitally signed JSON Web Token/JWT) from Entra ID.
Only requests presenting a valid token will be accepted—the rest are automatically blocked.
Why Secure Your API with Microsoft Entra ID Token Authentication?
Here’s why this is a game-changer for your API security and management:
- Enterprise-Grade Security:
Only authorized users or trusted applications—controlled by your Entra (Azure AD) tenant—can access your API.
No more worrying about leaked API keys or unapproved access. - Single Sign-On (SSO) & Centralized Identity:
Users and services already authenticated by your organization can access the API seamlessly, with no extra login or key management. - Easy User and Permission Management:
You can centrally manage who (or what apps) can call your API, and revoke access instantly from Azure Portal—no code changes needed. - Auditing & Compliance:
Every API call is tied to a specific identity. This means clear audit trails and easier compliance with enterprise requirements. - No Secret Keys in Code or URL:
No more hard-coded secrets in source code, no risk of accidental key leakage in logs or screenshots.
🟢How to Secure Your API with Microsoft Entra ID in Azure API Management
3.1. Register an Application in Entra ID (Azure AD)
- Go to the Azure Portal.
- In the left-side menu, click Microsoft Entra ID
- In the Microsoft Entra ID menu, select App registrations.
- Click + New registration at the top.
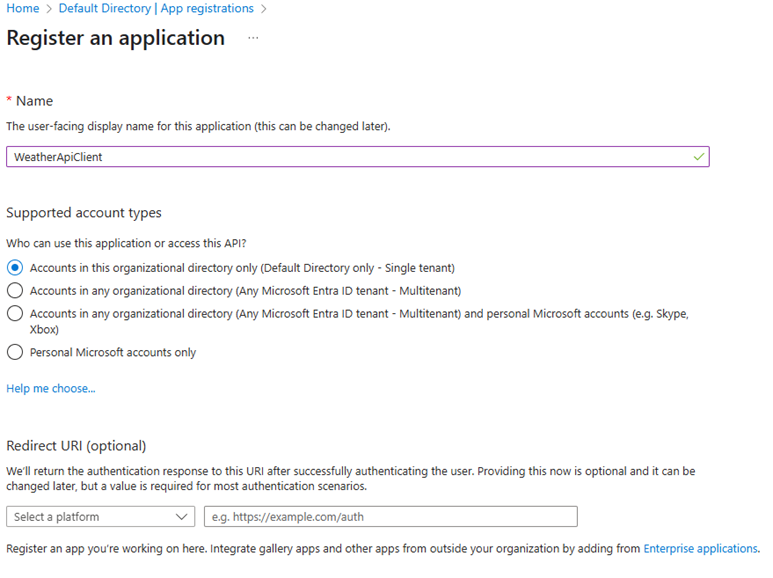
- Fill in:
- Name: e.g., WeatherApiClient
- Supported account types: Single tenant (default) is fine for internal APIs.
- (Leave Redirect URI blank for backend-to-backend API)
- After registration completes, copy:
- Application (client) ID
- Directory (tenant) ID
- In the left menu for your new app, choose Certificates & secrets.
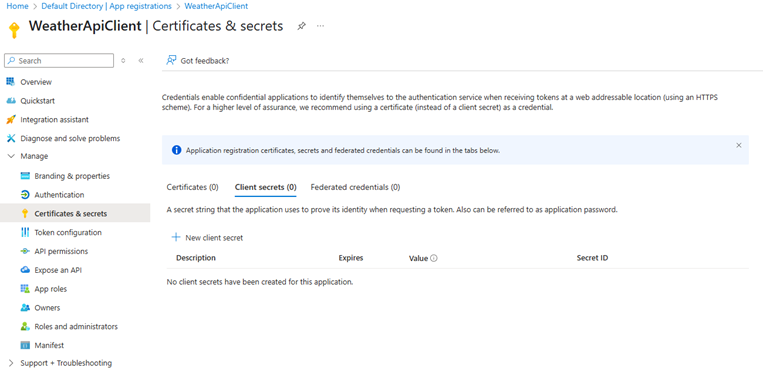
- Under Client secrets, click + New client secret, add a description, and set an expiry.
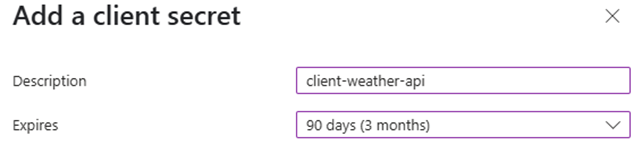
- Click Add and copy the secret value right away—you’ll need it for APIM configuration

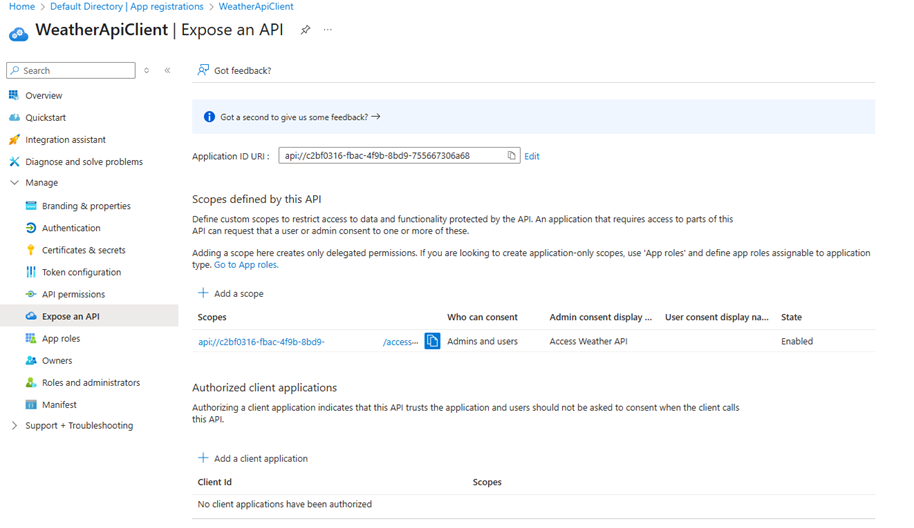
Before you can request tokens for your API or use it as a resource in Microsoft Entra ID (Azure AD), you must set an Application ID URI for your API application registration. This value acts as the unique “address” (identifier) for your API within your Azure tenant.
In the left-hand menu, click Expose an API > click + Add a scope.
- Fill out:
- Scope name: access_as_user (or anything you want, e.g., weather.read)
- Who can consent: Admins and users
- Admin consent display name: Access Weather API
- Admin consent description: Allows the app to access the Weather API.
- User consent display name: (same)
- User consent description: (same)
- State: Enabled
3.2. Configure OAuth 2.0/OpenID Connect in API Management
- Go to your API Management instance in the Azure Portal.
- Select your Weather API.
- Click APIs > APIs > Choose API weather-api
- Click on the /weather operation (or All operations if you want to protect the whole API)
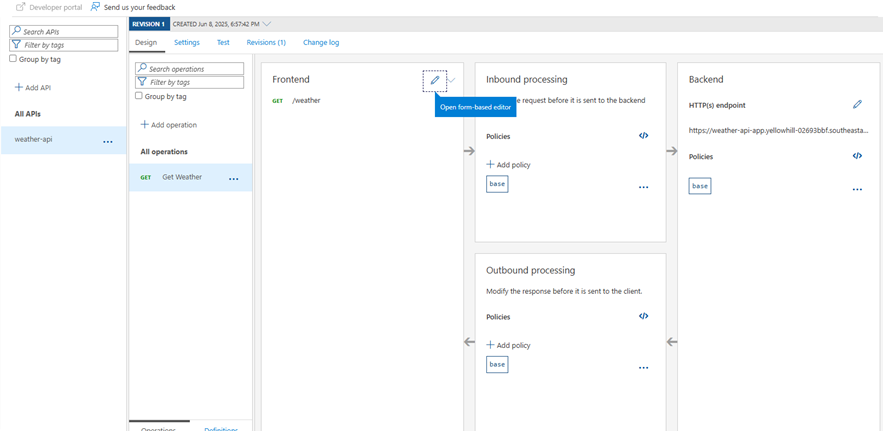
- Go to the Design tab, and in the Inbound processing section, click Add policy
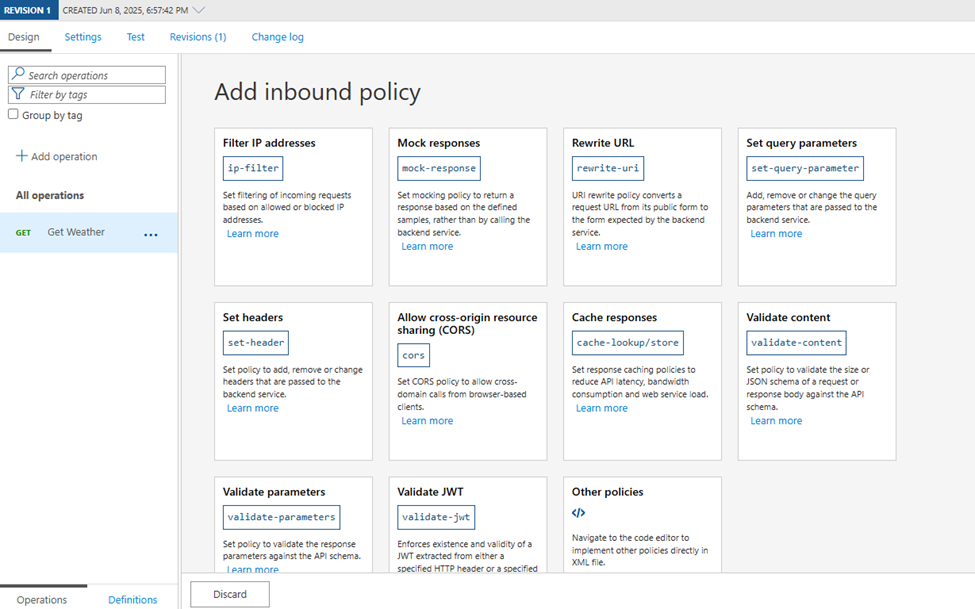
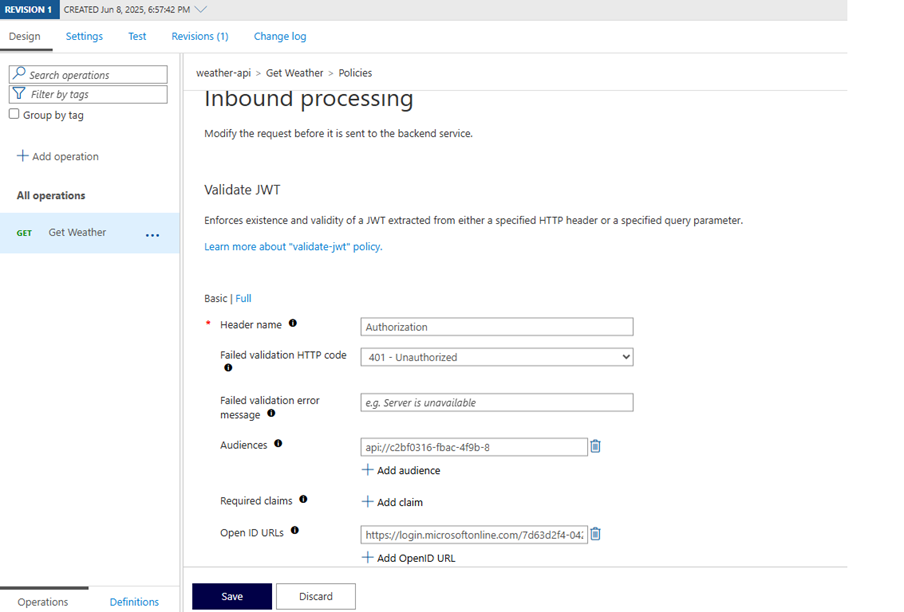
- Choose Validate JWT. Configure:
- Header name: Authorization
OpenID configuration URL:
https://login.microsoftonline.com/<tenant_id>/v2.0/.well-known/openid-configuration - Audiences:
api://<client_id>
- Header name: Authorization
The <tenant_id> in the OpenID configuration URL is your Azure Active Directory’s unique identifier, called the Directory (tenant) ID.
You can find it by going to the Azure Portal → Microsoft Entra ID → Overview, or from the “Overview” page of your registered application.
The <client_id> in api://<client_id> refers to your application’s Application (client) ID—the unique identifier assigned to your registered app in Microsoft Entra ID (Azure Active Directory).
You can find it in Azure Portal → Microsoft Entra ID → App registrations → Your app → Overview.
Save the policy
3.3. Test Access to Your API—With and Without Token Authentication
Now that your API Management instance is configured to require Microsoft Entra ID tokens, let’s see how it behaves for different types of requests:
Case 1: Accessing the API With Only the Subscription Key (No Token)
Make a request to your APIM endpoint with only the subscription key (no Authorization header):
curl "https://<your-apim-name>.azure-api.net/weather?city=Hanoi" \
  -H "Ocp-Apim-Subscription-Key: <your-subscription-key>"
You should receive a 401 Unauthorized error with a message like:

Why?
Because after enabling JWT validation, APIM expects every request to include a valid Bearer token. The subscription key alone is not enough for access anymore.
Case 2: Accessing the API With Both the Subscription Key and a Valid Token
First, obtain a valid Entra ID access token (using curl, Postman, or Azure CLI):
curl -X POST "https://login.microsoftonline.com/<tenant_id>/oauth2/v2.0/token" \
  -H "Content-Type: application/x-www-form-urlencoded" \
  -d "client_id=<client_id>&scope=api://<client_id>/.default&client_secret=<client_secret>&grant_type=client_credentials"
You can get access token as below

Copy the access_token value from the response.
Now call your API with both the subscription key and the Authorization header:
curl "https://<your-apim-name>.azure-api.net/weather/weather?city=Hanoi" \
  -H "Ocp-Apim-Subscription-Key: <your-subscription-key>" \
  -H "Authorization: Bearer <your-access-token>"
Result:
You receive a successful JSON response from your Weather API, for example:

This confirms that your API Management instance validated both your subscription key and the Entra ID access token—proving your security and routing setup works perfectly!
🚀 Conclusion: What You’ve Learned and What’s Next
Through this hands-on journey, you’ve tackled some of the most important real-world scenarios in modern cloud API development with Azure:
- Containerized a Flask API and deployed it securely on Azure Container Apps
- Exposed your backend through Azure API Management for robust, enterprise-ready API gateway capabilities
- Dove deep into Microsoft Entra ID authentication—learning to register apps, configure scopes, and enforce JWT validation for true zero-trust security
- Discovered how to combine subscription keys and token-based auth for maximum control and analytics
- Debugged and understood common OAuth pitfalls—turning frustrating errors into moments of mastery
- Automated your workflow with curl and bash to streamline token acquisition and API access
Along the way, you’ve not just built an API—you’ve made it secure, scalable, and production-grade. You now understand how Azure’s API security stack works under the hood, and you have the confidence to integrate these techniques into real projects.
APIs are like clubs—if anyone can walk in, expect chaos on the dance floor!