Managing user accounts across multiple Linux servers can be a daunting task, especially in large-scale environments. Manual tracking is not only time-consuming but also prone to errors. This guide demonstrates how to automate the process using Ansible, enabling you to collect comprehensive user information from remote servers and consolidate it into CSV files for centralized auditing.
“Why do it manually… when Ansible can do it automatically — and better, without complaining?”
— Every sane DevOps engineer, ever.
🧠 Overview of Ansible and Real-World Use Case
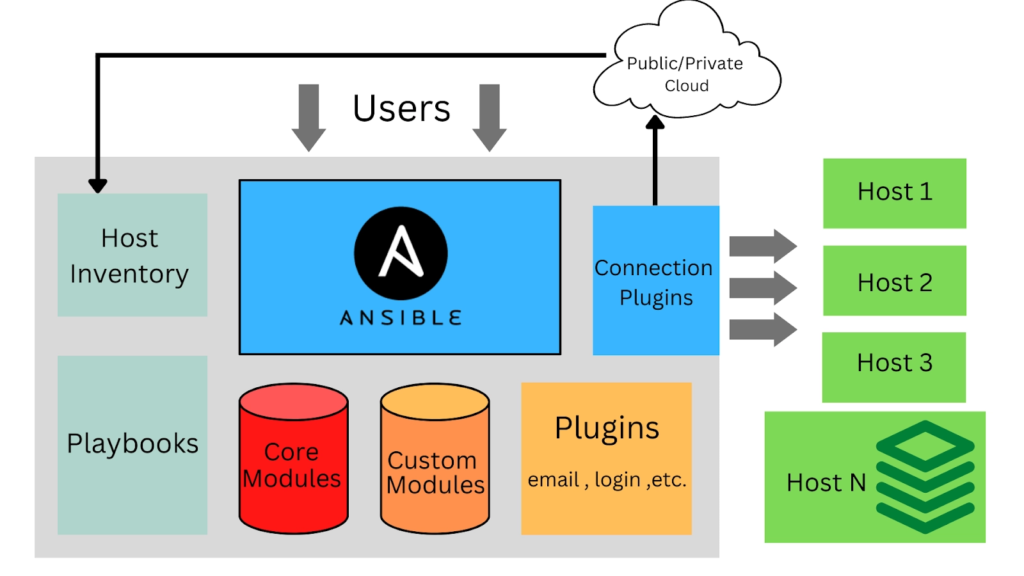
Ansible is an open-source automation tool designed for configuration management, application deployment, and infrastructure orchestration. It uses a simple, agentless architecture based on SSH and YAML, making it lightweight and easy to adopt — especially in DevOps environments.
Unlike more complex platforms that require agents or daemons running on managed hosts, Ansible connects to remote systems via SSH and pushes tasks written in playbooks (YAML syntax), ensuring speed and simplicity while maintaining powerful flexibility.
💡 Real-World Use Case: User Account Auditing at Scale
In enterprise environments, system administrators often manage hundreds of Linux servers spread across on-premise data centers and cloud providers. Over time, user accounts may be added, modified, or left orphaned, posing a serious security and compliance risk.
With Ansible, you can:
- Remotely execute scripts across all servers to extract user metadata
- Automatically fetch and centralize the reports in a structured format (like CSV)
- Schedule regular audits as part of your DevOps CI/CD or compliance pipeline
This use case aligns perfectly with the DevSecOps mindset, helping teams proactively detect unauthorized accounts or expired access, and maintain a secure infrastructure posture — without manual SSH into each server.
🧩 Why Automate User Account Inventory?
In DevOps and IT operations, maintaining an up-to-date inventory of user accounts is crucial for:
- Security Compliance: Ensuring only authorized users have access.
- Audit Readiness: Providing evidence of user account management.
- Operational Efficiency: Reducing manual overhead and potential errors.
🛠️ Prerequisites
Before proceeding, ensure you have:
- Ansible installed on your control node.
- SSH access to the target Linux servers.
- A user script (
get_user_info.sh) placed in/root/scripts/on each remote server.
📜 Step 1: Create the User Information Script
On each remote server, create a script named get_user_info.sh in /root/scripts/ with the following content:
#!/usr/bin/bash
hostname=`hostname`
echo "" > /tmp/get_user_result_of_$hostname.csv
echo "$hostname" >> /tmp/get_user_result_of_$hostname.csv
echo "Username, UserID, PrimaryGroup, HomeDirectory, DefaultShell, LastPasswordChangeDate, PasswordExpiryDate, AccountExpiryDate" >> /tmp/get_user_result_of_$hostname.csv

for Username in `cat /etc/passwd | awk -F":" '{print $1}'`
do
Userid=`cat /etc/passwd | grep -Ew ^$Username | cut -d":" -f3`
if [ $Userid -ge 1000 ];then
echo $Username

   UserPrimaryGroupId=`cat /etc/passwd | grep -Ew ^$Username | cut -d":" -f4`
   UserPrimaryGroup=`cat /etc/group | grep :"$UserPrimaryGroupId": | cut -d":" -f1`
   UserInfo=`cat /etc/passwd | grep -Ew ^$Username | cut -d":" -f5`
   UserHomeDir=`cat /etc/passwd | grep -Ew ^$Username | cut -d":" -f6`
   UserShell=`cat /etc/passwd | grep -Ew ^$Username | cut -d":" -f7`
   UserGroups=`groups $Username | awk -F": " '{print $2}'`
   PasswordExpiryDate=`chage -l $Username | grep "Password expires" | awk -F": " '{print $2}'`
   LastPasswordChangeDate=`chage -l $Username | grep "Last password change" | awk -F": " '{print $2}'`
   AccountExpiryDate=`chage -l $Username | grep "Account expires" | awk -F": " '{print $2}'`
   HomeDirSize=""
   if [[ $UserHomeDir == *"home"* ]]; then
      HomeDirSize=`du -hs $UserHomeDir | awk '{print $1}'`
   fi
   echo
   echo "$Username, $Userid, $UserPrimaryGroup, $UserHomeDir, $UserShell, $LastPasswordChangeDate, $PasswordExpiryDate, $AccountExpiryDate" >> /tmp/get_user_result_of_$hostname.csv

fi
done
📦 Step 2: Develop the Ansible Playbook
Create an Ansible playbook named get-user.yml with the following content:
- name: Get User List And Information From Remote Servers

  hosts: minioserver

  become: true

  tasks:

   - name: Set variable path of file to download

     set_fact:

      file_download: "/tmp/get_user_result_of_{{ ansible_hostname }}.csv"

   - name: Running Script To Get All User Information

     script:

      cmd: /root/scripts/get_user_info.sh

   - name: Create folder on localhost to store all result files download from remote Servers

     delegate_to: localhost

     file:

      path: /tmp/user_infors_download

      state: directory

      mode: '1777'

   - name: Download result file from remote server to localhost

     fetch:

      src: "{{ file_download }}"

      dest: "/tmp/user_infors_download/"

      flat: yes
🚀 Step 3: Execute the Playbook
Run the playbook using the following command:
#ansible-playbook get-user.yml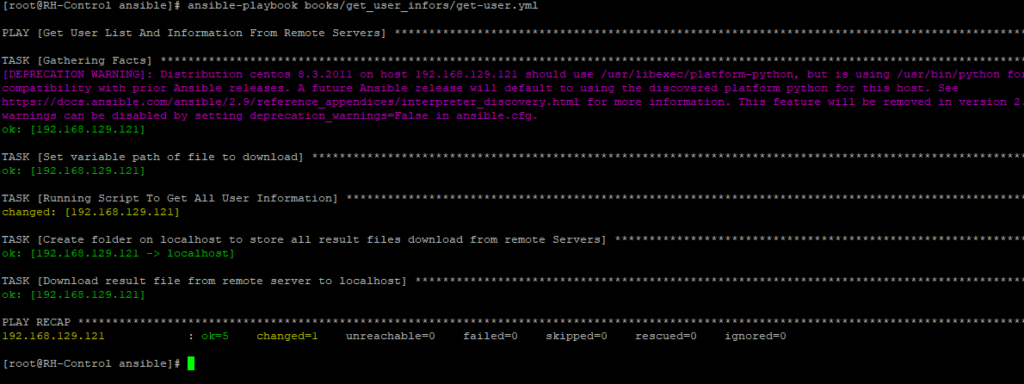
Upon completion, you’ll find the CSV files in /tmp/user_infors_download on your control node, each named according to the respective server’s hostname.
CSV file export from remote server has information as below

📌 Conclusion
Automating user account inventory across Linux servers using Ansible streamlines the auditing process, enhances security, and ensures compliance. By integrating this playbook into your routine operations, you can maintain an accurate and up-to-date record of user accounts across your infrastructure.