Provisioning a virtual machine is just the beginning. The real magic happens when you automate everything that comes after. Whether you’re setting up development environments, internal tooling, or lightweight services, having your VM boot up fully configured is a game-changer.
This is where cloud-init steps in—your first-boot automation ally. In this post, you’ll learn how to:
- Automatically install system dependencies
- Clone a Flask app from a GitHub repo
- Set up and run the app as a
systemdservice - Open firewall ports for access
All of it happens the moment your VM is provisioned, saving you time, clicks, and mistakes

🛠️ What is Cloud-Init?
Cloud-Init is a widely-used standard for automating the initialization of cloud instances across many platforms (Azure, AWS, OpenStack, etc.). On Azure, it’s supported by most Linux distributions, including Ubuntu.
Think of cloud-init as a set of instructions that run once—on the first boot of your VM. These instructions can:
- Update packages
- Install software
- Configure users and SSH keys
- Set up services
- Execute arbitrary commands
You can define these actions in a YAML script and provide it during VM creation—via Azure Portal, CLI, or ARM/Bicep templates. It enables infrastructure as code right from the OS level. Cloud-init turns a “fresh” VM into a fully configured, ready-to-use system—automatically, reliably, and repeatably.
🌐 Use Case: Deploy Flask App from Git + Open Port
Let’s walk through a real-world use case:
Deploy an Ubuntu VM on Azure that:
- Installs Python, pip, Git, and UFW (firewall)
- Clones a Flask app from GitHub
- Installs Python requirements
- Starts the app as a
systemdservice - Opens port 8080 for HTTP access
App source: https://github.com/vominhtri1991/warehouse_app.git
I/Step 1: Cloud-Init Script Explained
Here’s the complete cloud-init YAML script:
#cloud-config
package_update: true
packages:
  - python3-pip
  - git
  - ufw

runcmd:
  - git clone https://github.com/vominhtri1991/warehouse_app.git /usr/var/warehouse_app
  - pip3 install -r /usr/var/warehouse_app/requirements.txt
  - |
    echo "[Unit]
    Description=Warehouse Flask App
    After=network.target

    [Service]
    User=azureuser
    ExecStart=/usr/bin/python3 /usr/var/warehouse_app/app.py
    Restart=always

    [Install]
    WantedBy=multi-user.target" > /etc/systemd/system/warehouse.service
  - systemctl daemon-reexec
  - systemctl enable warehouse
  - systemctl start warehouse
  - ufw allow 8080
  - ufw allow 22
  - ufw --force enable
🔍Breakdown:
package_update: true: ensures apt-get package lists are updatedpackages:installs pip, git, and UFW for firewall controlruncmd:runs shell commands after packages are installed:- Clones the Flask app from GitHub
- Installs the Python dependencies
- Writes a
systemdservice file to run the Flask app
- Enables and starts the service
- Configures UFW to allow traffic on port 8080 and enables the firewall
You can save this script as cloud-init.yaml and pass it during VM creation.
II/Step 2: Create Your Azure VM with Cloud-Init Using Azure CLI
Run the following command (update with your own values) on Powershell:
az vm create `
  --resource-group <resource group name> `
  --name App-Flask-Warehouse `
  --image Ubuntu2204 `
  --admin-username azureuser `
  --admin-password "YourP@ssw0rd123" `
  --custom-data cloud-init.yaml `
  --size Standard_B1s `
  --authentication-type password `
  --output json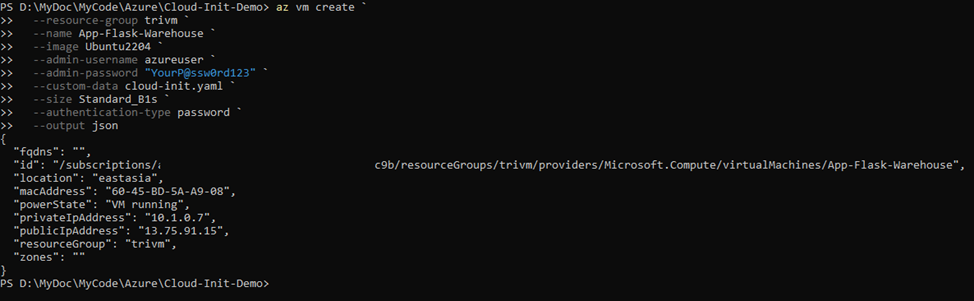
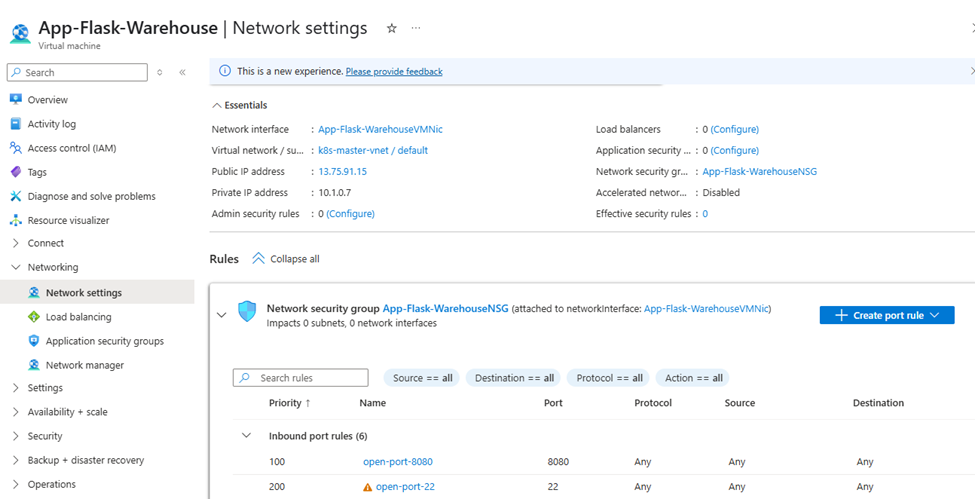
Then open port 8080 and 22 on the VM’s NSG:
az vm open-port --resource-group <resource group name>--name <VM name> --port 22 --priority 200
az vm open-port --resource-group <resource group name>--name <VM name> --port 8080 --priority 100
After running the az vm create command, you can verify in the Azure Portal that the virtual machine has been successfully created and that the associated Network Security Group (NSG) includes a rule allowing inbound traffic on port 8080 and 22.
III/Verify Deployment:
After provisioning the Azure VM and applying your cloud-init script, follow these steps to verify that your Flask app is running and accessible.
SSH into the Azure VM using public IP address of your VM and the admin username you specified > Check if the firewall allows port 8080
sudo ufw status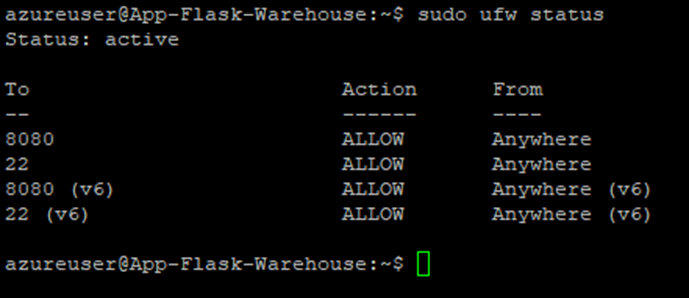
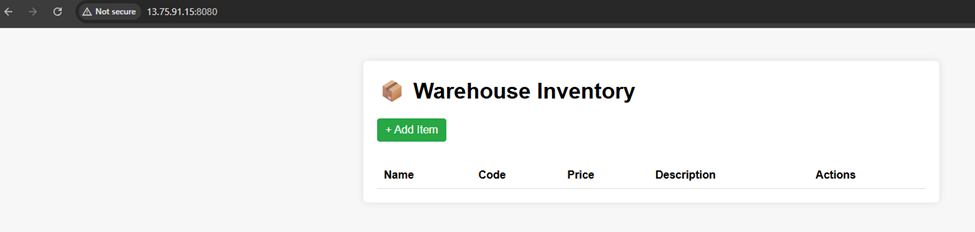
Test the Flask app in your browser: http://<your-public-ip>:8080/
If everything worked, you should see your Flask app (from the warehouse_app repo) running!
💡Conclusion: One VM, One Script — Infinite Possibilities
With just a few lines of YAML and one CLI command, you’ve gone from zero to a fully functional Flask app running on an Azure VM — automatically. That’s the magic of Cloud-Init.
Whether you’re spinning up dev environments, deploying internal tools, or laying the foundation for something bigger, this approach brings you speed, consistency, and control — without the need for complex pipelines or manual steps.
It’s not just automation — it’s peace of mind, baked right into your infrastructure.
Now go build something awesome — your VM is already waiting. 🚀
“I don’t always create VMs, but when I do, they deploy themselves.”
— TechNoStress