Ever wondered why we don’t just expose Kubernetes services directly with an Azure Load Balancer? Or whether you still need to deploy NGINX Ingress Controller when Application Gateway already exists? In this guide, we’ll break down those architectural decisions while walking you through a fully secure and production-grade AKS setup — built entirely from the Azure Portal.
This design is based on Microsoft’s best practices, with hub-spoke networking, private link integration, and layered security. We’ll skip the on-premises gateway part and focus on:
- AKS with system & user node pools
- Application Gateway for Ingress
- Azure Firewall (outbound)
- Bastion (management)
- Key Vault & ACR with Private Link
- Monitoring with Azure Monitor + Prometheus
🎯Why This Network Topology?
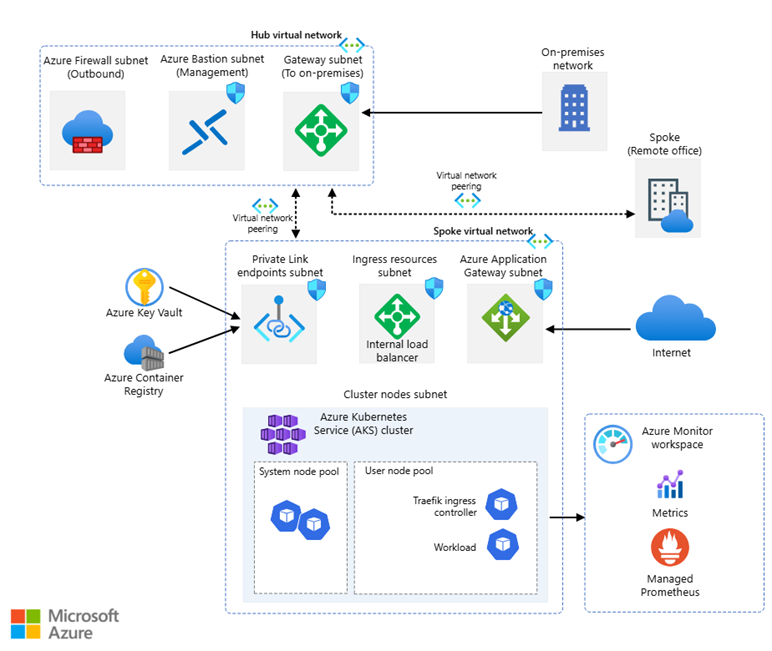
This architecture is a reference model for secure and scalable AKS deployments following the hub-and-spoke network topology. Let’s briefly review what each component does and why it’s critical for a modern DevOps deployment.
💡Hub-Spoke Topology: Security Meets Scalability:
- Hub Virtual Network: Acts as the central control plane, hosting shared security and connectivity services such as Azure Firewall and Azure Bastion. It centralizes control over egress and management traffic.
- Spoke Virtual Network: Dedicated to hosting the core workload environment. This VNet is designed for running the actual application workloads and Kubernetes infrastructure. Specifically, it contains:
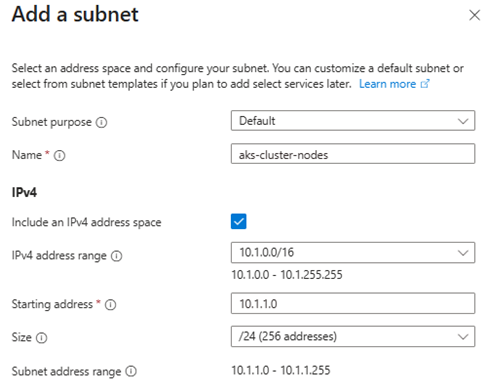
- AKS cluster node pools subnet: Subnet
aks-cluster-nodes(e.g., 10.1.1.0/24), where both the system and user node pools of the AKS cluster reside. This is where containerized workloads are executed.
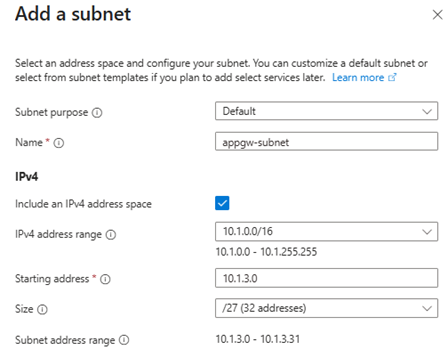
- Application Gateway subnet to enable internet ingress with Layer 7 routing and WAF protection.
- Private endpoint subnet for services like ACR and Key Vault, ensuring secure access over Azure backbone.
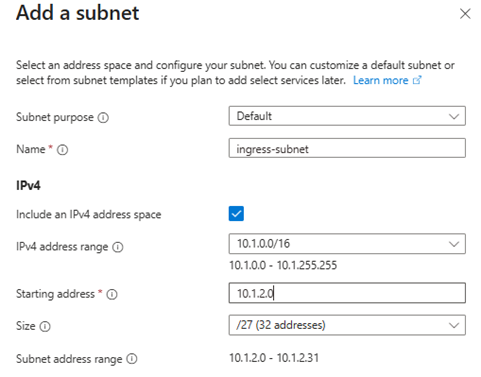
- Ingress subnet for internal services exposed via internal LoadBalancer. This separation of concerns ensures a cleaner, more secure architecture while enabling easier scaling, observability, and isolation of services.
- AKS cluster node pools subnet: Subnet
- VNet Peering: Ensures low-latency, high-bandwidth, secure communication between hub and spoke.
✨Architecture Considerations:
1/Why not expose services via Azure Load Balancer?
Using type: LoadBalancer to expose AKS services creates a public IP via Azure Load Balancer with no TLS termination, WAF, or HTTP routing capabilities. It’s great for quick testing — but dangerous and limiting in production. Application Gateway provides full Layer 7 features: WAF, TLS, HTTP routing, autoscaling, and native AKS integration (AGIC).
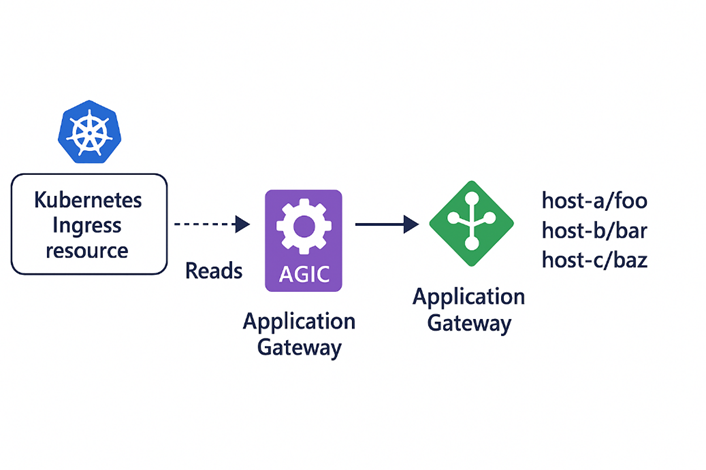
2/Do I need NGINX Ingress Controller with Application Gateway?
No. Application Gateway + AGIC replaces the need for NGINX in most cases. AGIC (Application Gateway Ingress Controller) reads your Kubernetes Ingress resources and dynamically configures the Application Gateway based on those definitions. It runs as a pod inside the AKS cluster and communicates with Azure Resource Manager to keep the Application Gateway configuration in sync with your Kubernetes Ingress objects.
NGINX is still useful in multi-cloud or custom logic scenarios, but for native Azure deployments, AGIC is the better choice.
🌐Step-by-Step Deployment Guide (Azure Portal Only)
I. Set Up Hub and Spoke Virtual Networks:
Purpose: Create isolated yet connected networks to host shared services (Hub) and workload/application environments (Spoke).
- Go to Azure Portal > Virtual networks > Create.
- Create Hub VNet:
- Name:
vnet-hub
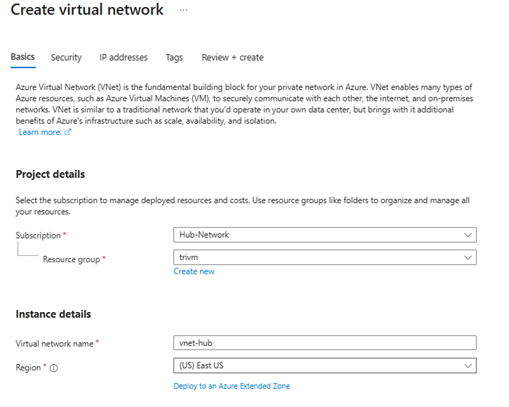
- Address space:
10.0.0.0/16
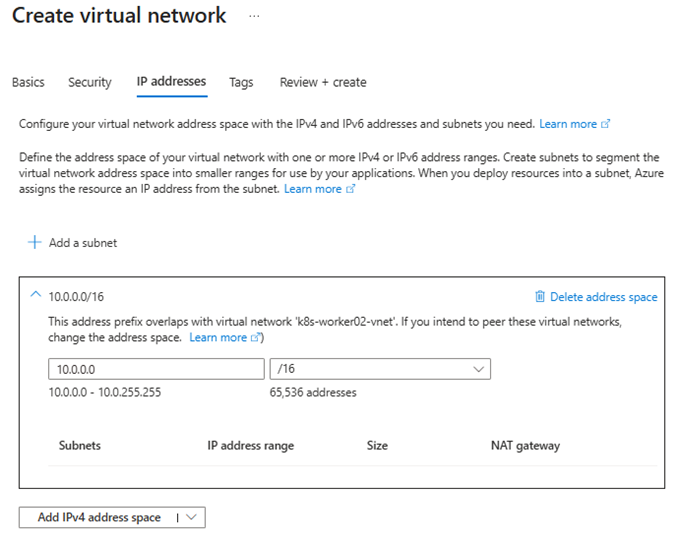
- Add subnets:
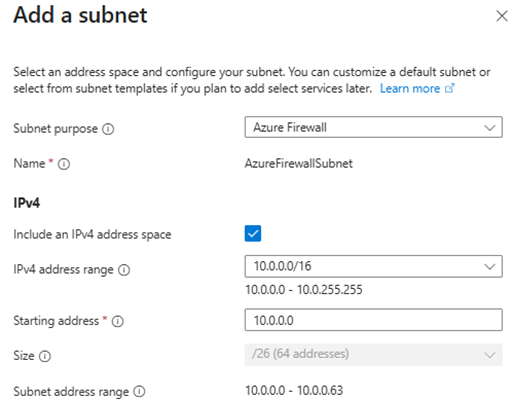
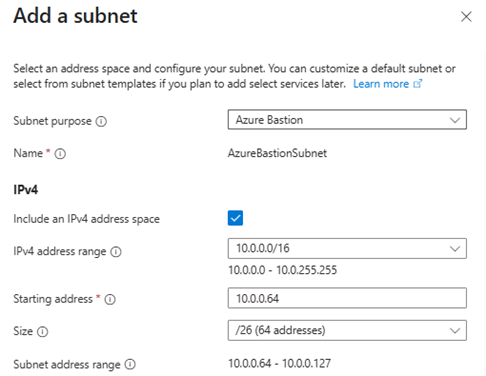
AzureFirewallSubnet– Important: The subnet name must be exactlyAzureFirewallSubnetto allow Azure Firewall deployment.AzureBastionSubnet– Important: The subnet name must beAzureBastionSubnetand the prefix size must be at least /27. This is required by Azure Bastion and will fail validation otherwise.
3. Create Spoke VNet:
- Name:
vnet-spoke
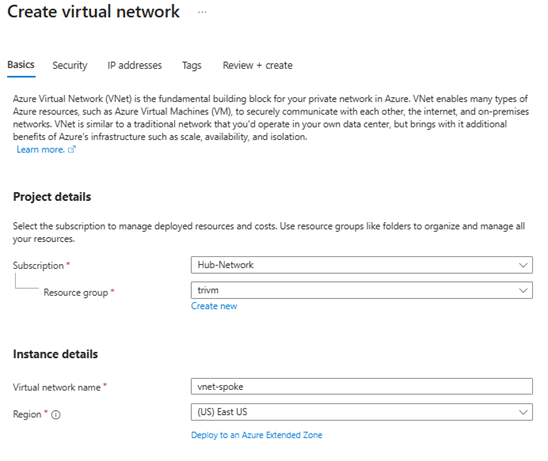
- Address space:
10.1.0.0/16
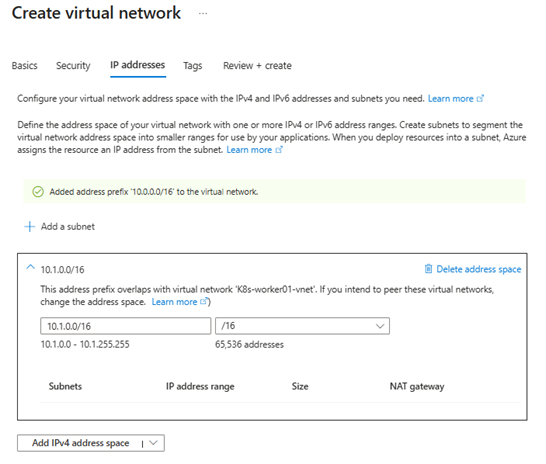
- Add subnets:
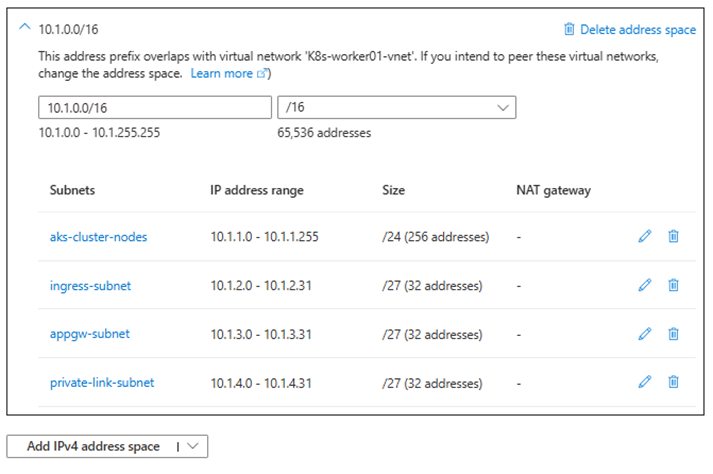
aks-cluster-nodes(10.1.1.0/24)
ingress-subnet(10.1.2.0/27)
appgw-subnet(10.1.3.0/27)
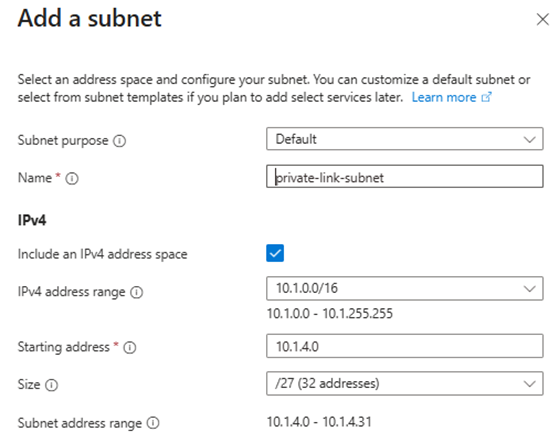
private-link-subnet(10.1.4.0/27)
4.Set up VNet Peering:
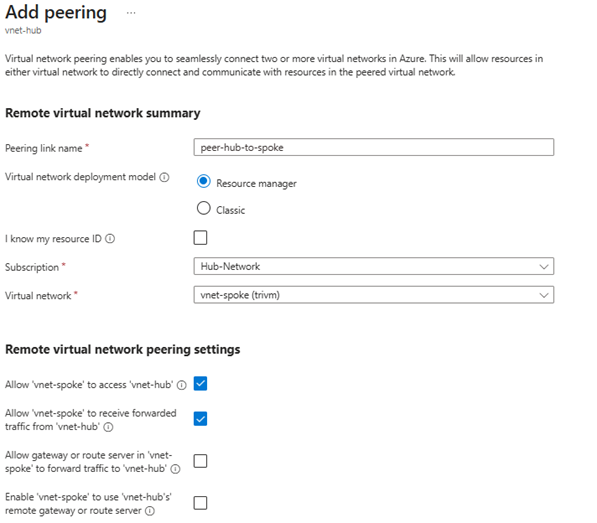
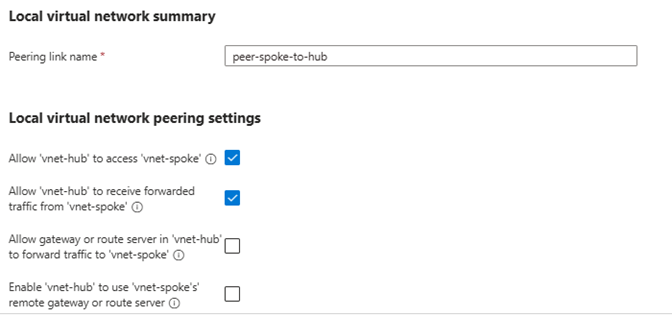
You only need to configure the peering once from the vnet-hub side if you fill out both the Remote virtual network peering and Local virtual network summary sections. This creates a two-way peering connection automatically.
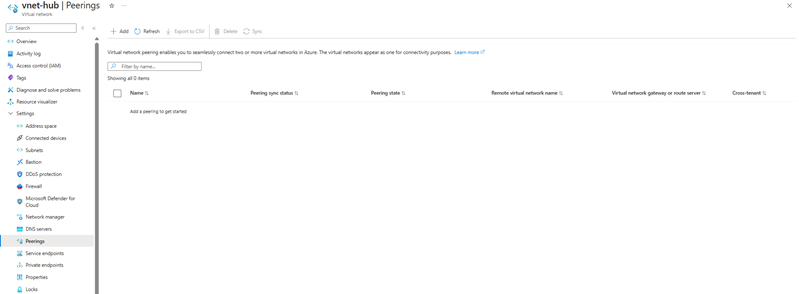
- Go to Virtual networks > vnet-hub > Peerings > Add:
- Name:
peer-hub-to-spoke
- Peering from:
vnet-hub
- Peering to:
vnet-spoke
- Enable: Allow forwarded traffic ✅
- Enable: Allow gateway transit ✅ (if using Azure Firewall as gateway)
- Name:

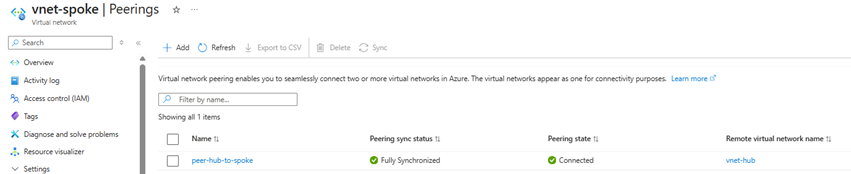
5. Go to Virtual networks > vnet-spoke > Peerings > Check
II/ Deploy Azure Firewall & Rule Collection:
Purpose: Ensure AKS system and user node pools can securely access the Internet for tasks such as OS patching, image pulling from trusted public registries, and outbound telemetry — through a controlled and observable firewall.
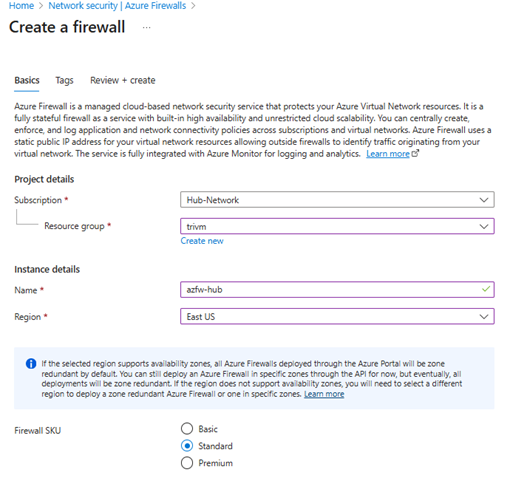
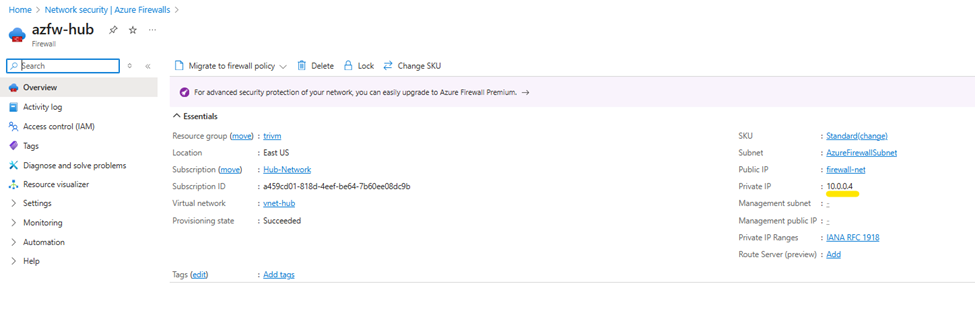
1/Deploy Azure Firewall:
- Go to Azure Portal > Create a resource > Firewall
- Resource group: same as your hub network
- Name:
azfw-hub - Virtual network:
vnet-hub - Subnet: Must be named
AzureFirewallSubnet(e.g.,10.0.1.0/24) - Public IP: Create new (
azfw-hub-pip)
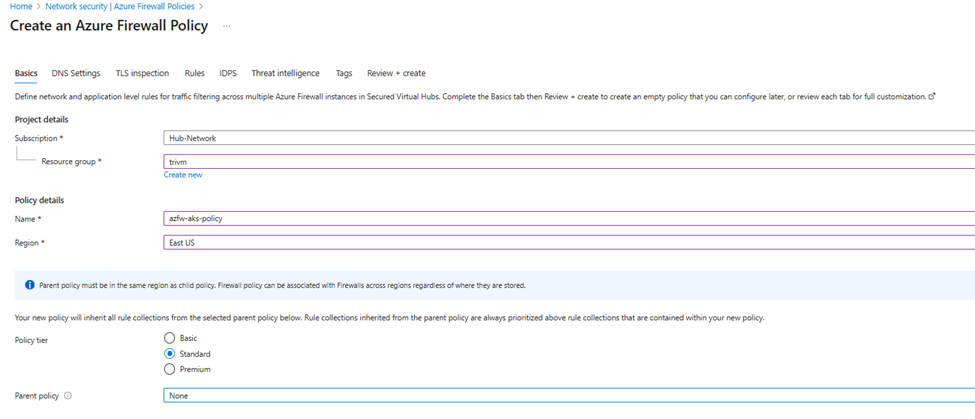
2/Create Firewall Policy:
When you associate a route table with the aks-cluster-nodes subnet that forces all traffic through Azure Firewall, you must explicitly allow outbound access to Azure services. This is essential for:
- Managed Identity (MI) authentication
- AKS cluster operations (e.g., image pulls, API calls, telemetry)
- Node updates, time sync, and OS patching
Azure groups all these endpoints under the AzureCloud service tag.
- Go to Firewall Policies > Create
- Name:
azfw-aks-policy
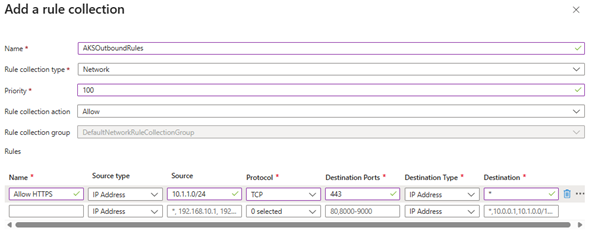
- Add a rule collection group named
AKSOutboundRules - Add rule collection:
- Name:
Allow-AKS-Internet
- Rule type: Network
- Action: Allow
- Priority: 100
- Name:
- Add rules:
- Allow HTTPS
- Name:
Allow-HTTPS
- Protocol: TCP
- Source:
10.1.1.0/24(AKS node subnet)
- Destination:
Internet
- Destination port: 443
- Name:
- Allow HTTPS
- Go to Firewall Policies >
azfw-aks-policy - Rule collections > Add > Rule collection

III/Deploy AKS Cluster (System and User Node Pools):
Purpose: Provision the managed Kubernetes service that runs your containerized applications.
Run Azure CLI:
az aks create --name aks-secure-cluster --resource-group trivm --location eastus --vnet-subnet-id (az network vnet subnet show --resource-group trivm --vnet-name vnet-spoke --name aks-cluster-nodes --query id -o tsv) --network-plugin azure --network-policy azure --enable-managed-identity --generate-ssh-keysOnce the AKS cluster creation process completes, you can verify that the cluster is up and running using the following command:
az aks show --resource-group <resource group name> --name <cluster name> --output tableThis command returns key details about your AKS cluster in a readable table format — including its provisioning state, Kubernetes version, node resource group, and network configuration. Look for "Succeeded" under the ProvisioningState to confirm a successful deployment.

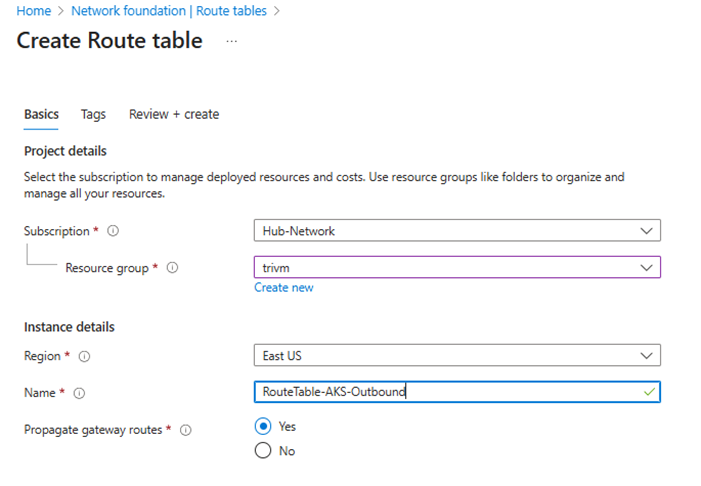
🔄 Route Table Association (IMPORTANT)
Purpose: Direct outbound traffic from AKS node pool to Azure Firewall for centralized egress control, inspection, and logging.
- Go to Route tables > Create.
- Name:
RouteTable-AKS-Outbound
3. Add a route
- Route name: AKS-Outbound-FW
- Address prefix:
0.0.0.0/0 - Next hop type: Virtual appliance
- Next hop IP address: Private IP of Azure Firewall in
AzureFirewallSubnet
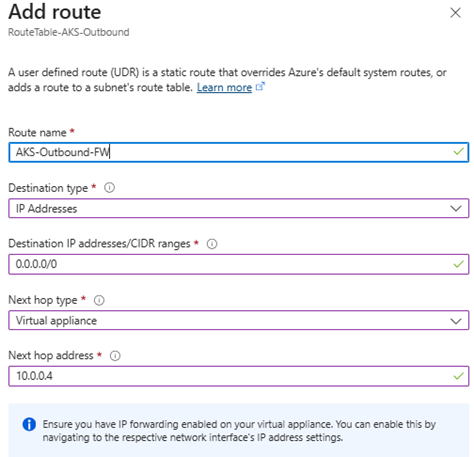
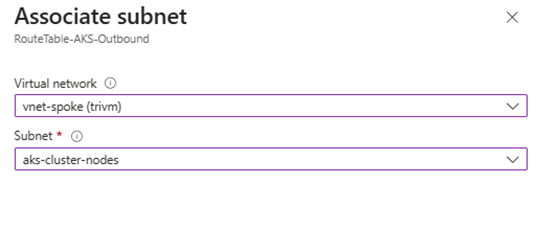
4. Associate the route table with subnet aks-cluster-nodes in vnet-spoke
✅ This ensures all outbound traffic from AKS nodes (including OS updates, image pulls, telemetry, etc.) flows through Azure Firewall. This is critical for security, observability, and compliance in production environments.
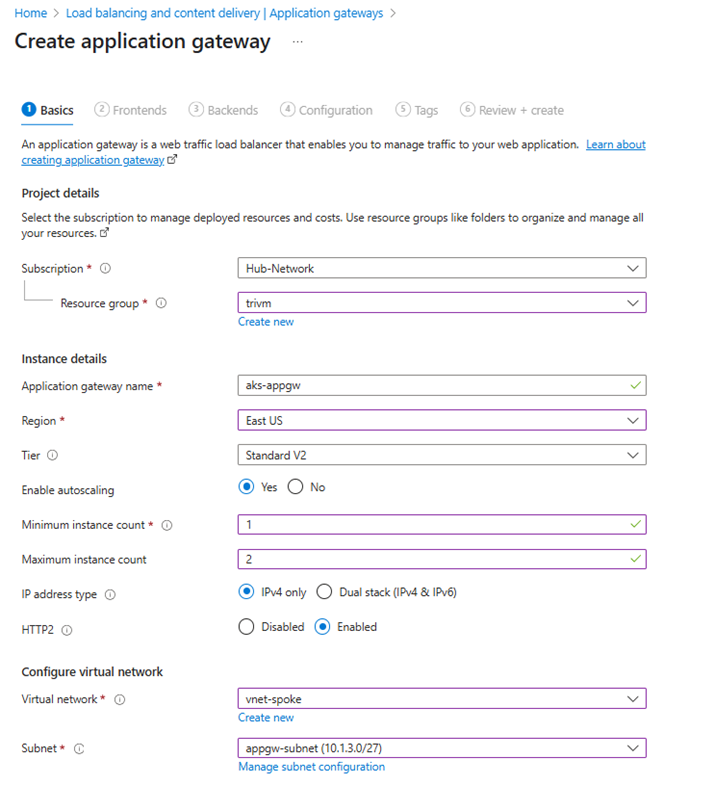
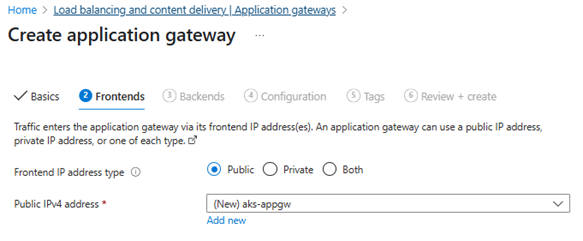
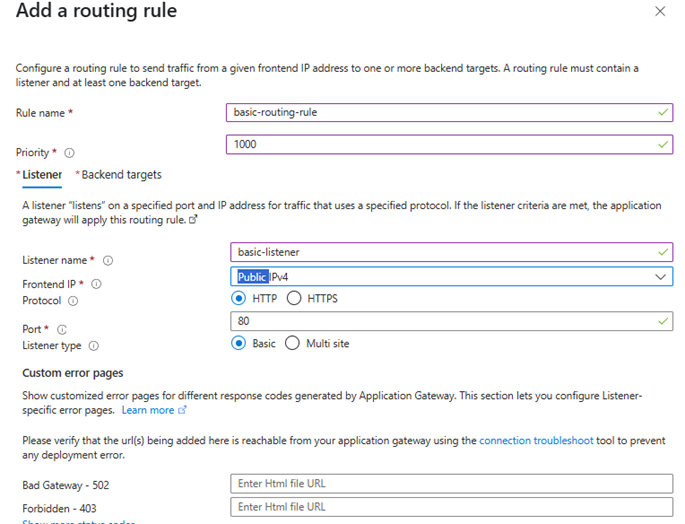
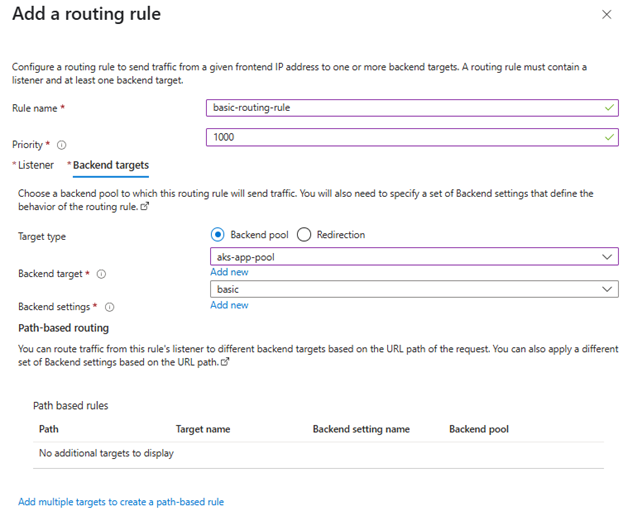
IV/Install AGIC and Deploy Application Gateway:
Purpose: Provide L7 Ingress for HTTP/HTTPS with WAF and autoscaling.
- Go to Application Gateway > Create
- Choose subnet:
appgw-subnetinvnet-spoke - Create a public frontend IP
- Enable WAF (optional)
- Complete the deployment
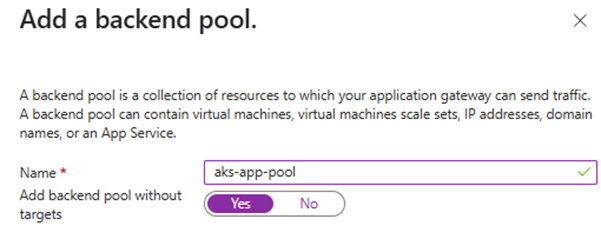
💡 On initial Application Gateway creation (via Portal), Azure still requires you to create at least a placeholder routing rule (dummy listener + backend). AGIC will then overwrite or append new rules.
So:
- Yes, during Application Gateway creation, just create a basic routing rule.
- Later, AGIC will manage the full config.
6. Enable the AGIC add-on in existing AKS cluster through Azure CLI
Run Azure CLI:
$appgwId=(az network application-gateway show --name <Application gateway name> --resource-group <Resource group name> -o tsv --query "id")
az aks enable-addons --name <AKS cluster name> --resource-group <Resource group name>  --addon ingress-appgw --appgw-id $appgwId
✅ Verify AGIC Integration on Azure Portal
To confirm that Application Gateway Ingress Controller (AGIC) is properly enabled for your AKS cluster, follow these steps:
- Navigate to Azure Portal > Kubernetes services.
- Select your AKS cluster.
- In the left-hand menu, go to Settings > Networking.
- Under the Application Gateway Ingress Controller section, verify that:
- Status is set to Enabled
- The Application Gateway is correctly selected

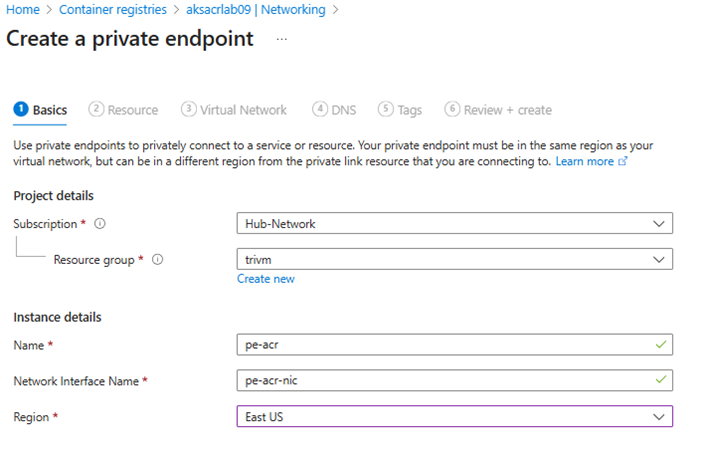
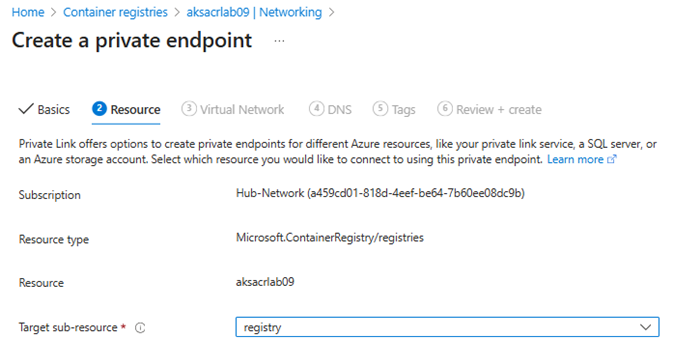
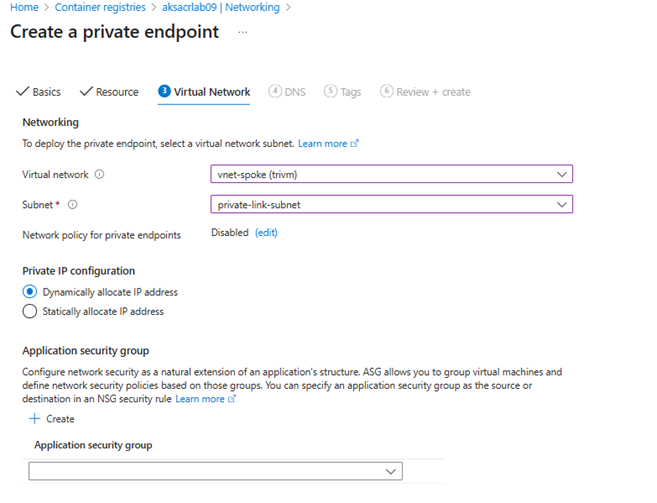
V/Set up Azure Container Registry (ACR) with Private Endpoint:
Purpose: Host your container images securely and privately, ensuring AKS nodes pull images over the Azure backbone without public internet exposure.
1/Create a new ACR:
$MYACR="aksacrlab09"
az acr create --name $MYACR --resource-group <resource group name> --sku Premium
2/ Create a private endpoint
Settings, select Networking> Private access
- Click + Create a private endpoint connection
- Name:
pe-acr - Region: same as your VNet
- Target sub-resource:
registry(default) - Virtual Network:
vnet-spoke - Subnet:
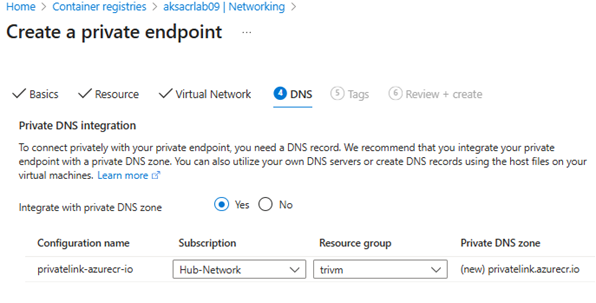
private-link-subnet - Enable integrate with private DNS zone: Yes
VI/ Attach an ACR to an existing AKS cluster:
Integrate an existing ACR with an existing AKS cluster using the az aks update command with the –attach-acr parameter and a valid value for acr-name
az aks update --name <aks cluster name> --resource-group <resource group name> --attach-acr <acr-name>Push your application image to ACR
Download demo image app at github: https://github.com/vominhtri1991/warehouse_app.git
If you have a local Docker image (e.g., warehouse-app:2.0), push it to your ACR:
# Step 1: Login to ACR
az acr login --name <acr name>

# Step 2: Tag local image with ACR format
# Suppose login server is: <acrname>.azurecr.io

docker tag warehouse-app:2.0 <login server>/warehouse-app:2.0

# Step 3: Push image to ACR
docker push <login server>/warehouse-app:2.0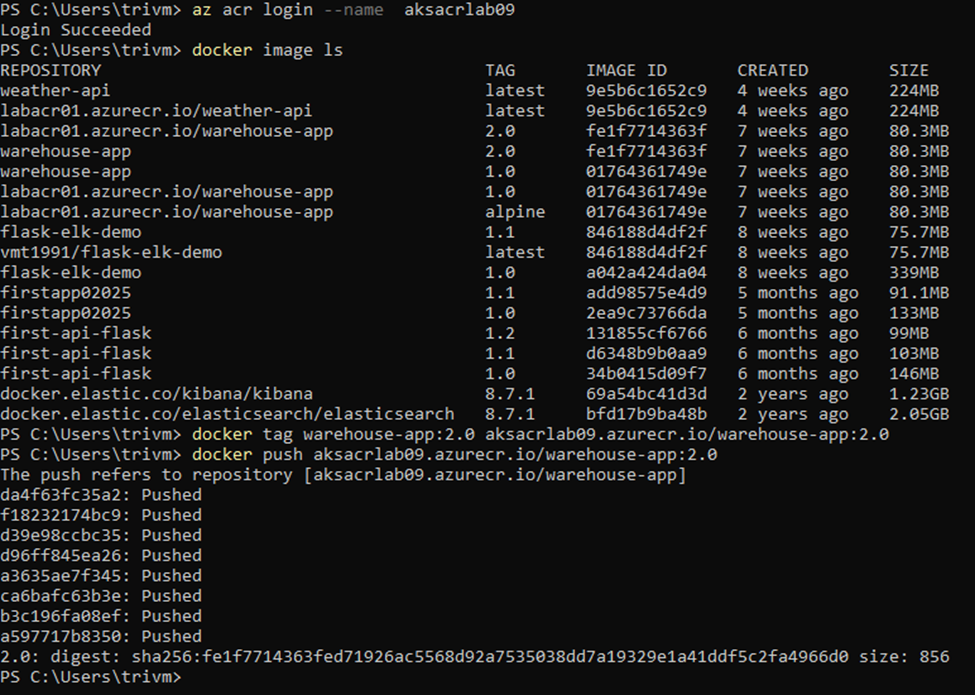
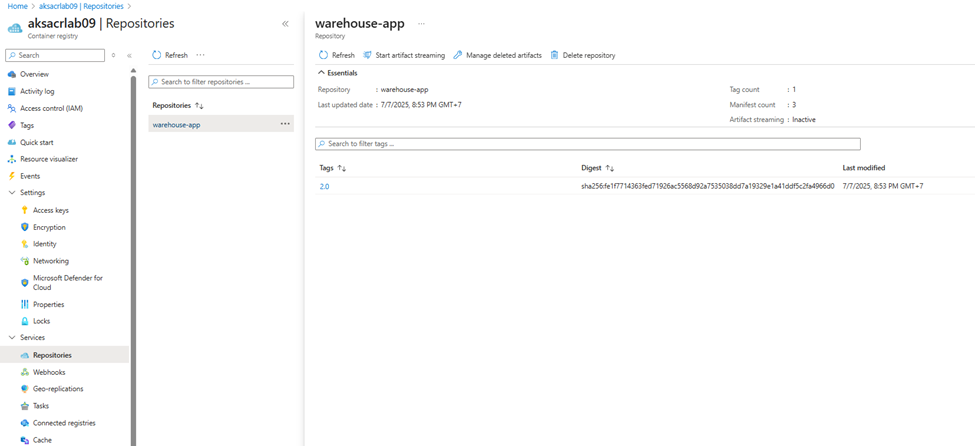
Go to Azure Portal > Container Registries > Services > Repositories to verify that warehouse-app with tag 2.0 appears in the list.
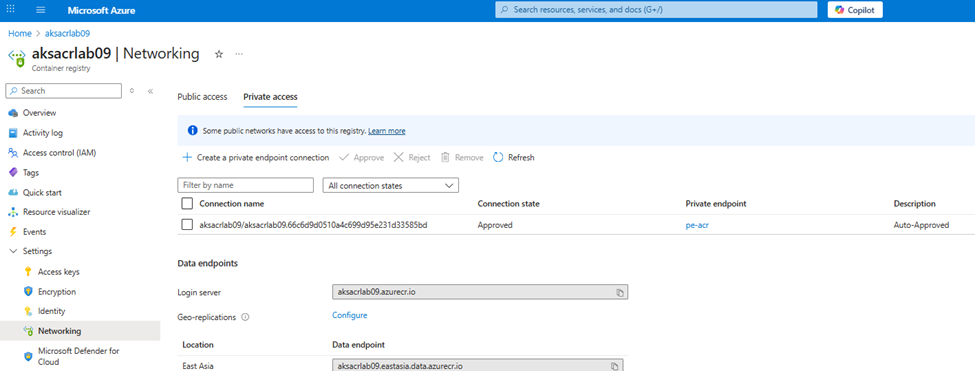
🔍 Verify ACR Private Link is Working
You can verify that AKS is pulling images through the private endpoint instead of the public internet:
Step 1: Deploy a test pod and use nslookup on AKS to resolve the ACR address.
Generate kubeconfig file for the cluster:
az aks get-credentials --resource-group resourcegroupname --name clustername
Deploy pod with yaml file
apiVersion: v1
kind: Pod
metadata:
  name: dnsutils
spec:
  containers:
  - name: busybox
    image: busybox
    command:
      - sleep
      - "3600"
  restartPolicy: Always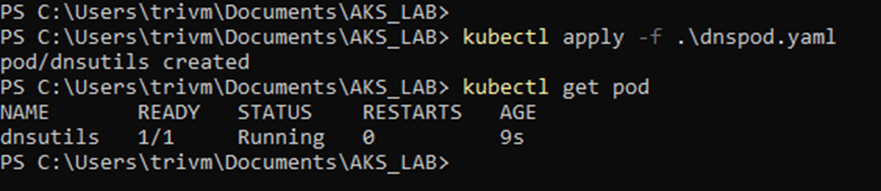
Execute dns resolve login server of ACR
kubectl exec -it dnsutils -- nslookup <acrname>.azurecr.io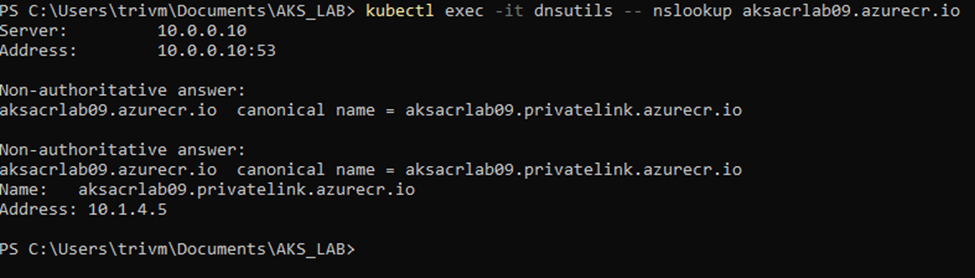
✅ If the DNS resolves to a 10.x.x.x address (e.g., in 10.1.4.0/27), the private link is working
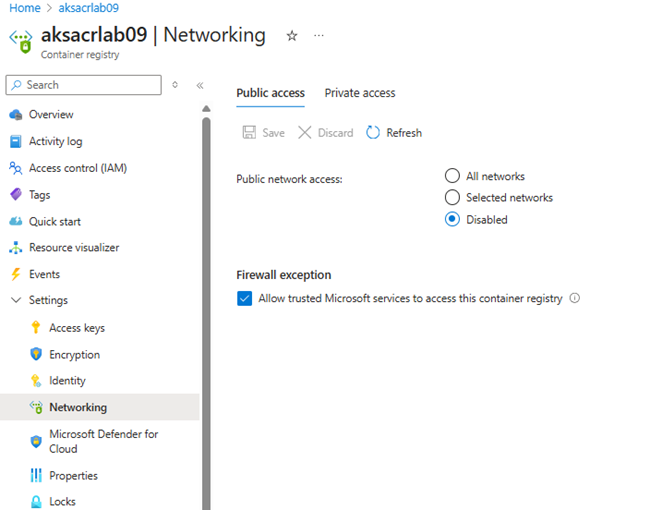
Step 2: In Azure Portal, go to ACR > Networking and confirm:
- Public network access: Disabled
- Private endpoint: Enabled
- DNS zone: privatelink.azurecr.io is linked
These steps ensure image pulls happen entirely within the Azure backbone network.
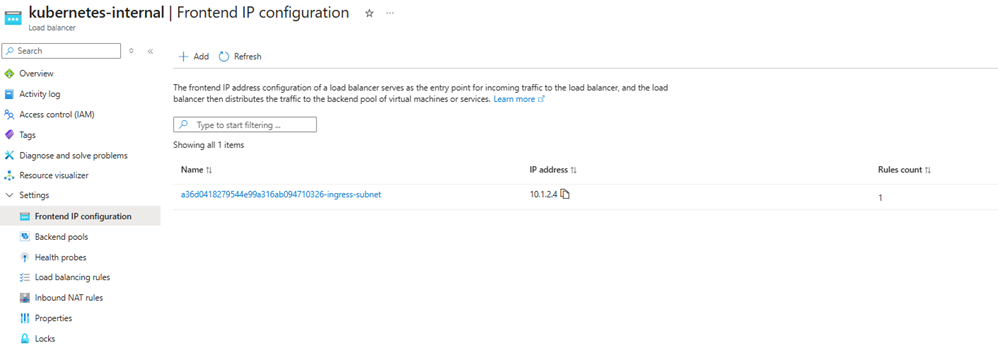
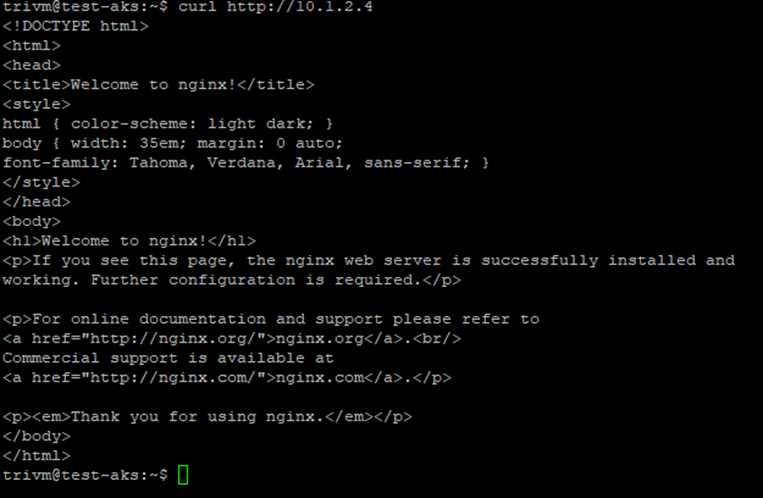
VII/Deploy an internal application on AKS using an Internal Load Balancer
Azure will auto-create an Internal Load Balancer in the subnet of your AKS nodes by default. To force the ILB to be created in a specific subnet such as ingress-subnet, use the annotation:
annotations:
  service.beta.kubernetes.io/azure-load-balancer-internal: "true"
  service.beta.kubernetes.io/azure-load-balancer-internal-subnet: "ingress-subnet"
Example: Expose NGINX and HTTPD via Internal LB
apiVersion: apps/v1
kind: Deployment
metadata:
  name: nginx-deploy
spec:
  replicas: 1
  selector:
    matchLabels:
      app: nginx
  template:
    metadata:
      labels:
        app: nginx
    spec:
      containers:
      - name: nginx
        image: nginx
        ports:
        - containerPort: 80
---
apiVersion: v1
kind: Service
metadata:
  name: nginx-service
  annotations:
    service.beta.kubernetes.io/azure-load-balancer-internal: "true"
    service.beta.kubernetes.io/azure-load-balancer-internal-subnet: "ingress-subnet"
spec:
  selector:
    app: nginx
  ports:
  - port: 80
    targetPort: 80
  type: LoadBalancer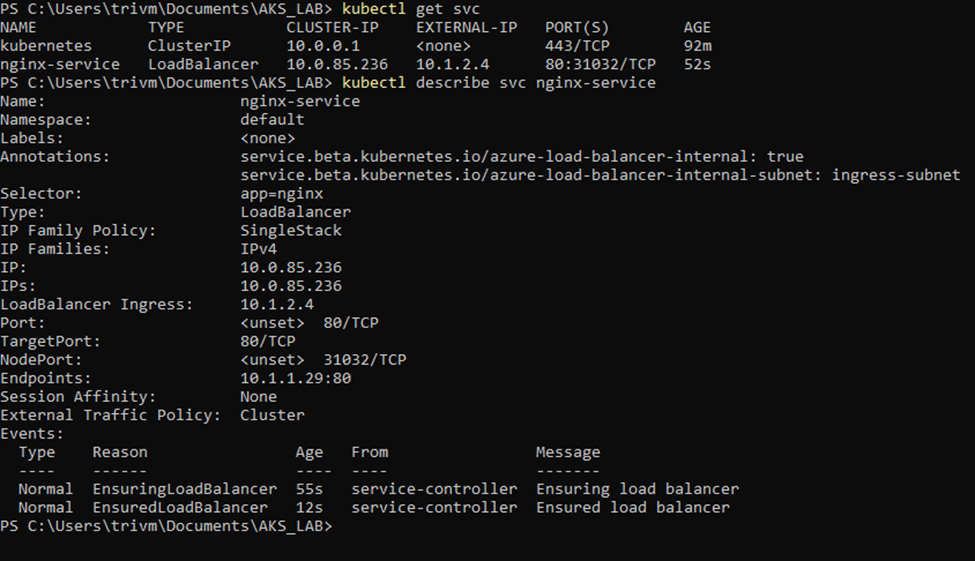
✅Once the Service is deployed, head over to the Azure Portal — you’ll notice that AKS has automatically provisioned an Internal Load Balancer with a frontend IP pulled from the ingress-subnet. This IP is your gateway to securely accessing the application within your virtual network.
VIII/Deploy Web App Using Application Gateway Ingress (AGIC)
Purpose: Publish a web app using your custom image (warehouse-app:2.0) via Kubernetes Ingress exposed through Azure Application Gateway.
1/Deploy your app using the image hosted in ACR (note: this image listens on port 8080 internally):
apiVersion: apps/v1
kind: Deployment
metadata:
  name: warehouse-app
spec:
  replicas: 1
  selector:
    matchLabels:
      app: warehouse-app
  template:
    metadata:
      labels:
        app: warehouse-app
    spec:
      containers:
      - name: warehouse
        image: aksacrlab09.azurecr.io/warehouse-app:2.0
        ports:
        - containerPort: 8080
2/Expose it as a Kubernetes service (note: internal container port is 8080, mapped to external port 80):
apiVersion: v1
kind: Service
metadata:
  name: warehouse-service
spec:
  selector:
    app: warehouse-app
  ports:
  - port: 80
    targetPort: 8080
  type: ClusterIP
3/Create an Ingress resource connected to Application Gateway:
apiVersion: networking.k8s.io/v1
kind: Ingress
metadata:
  name: warehouse-ingress
  annotations:
    kubernetes.io/ingress.class: azure/application-gateway
spec:
  rules:
  - host: yourapp.eastus.cloudapp.azure.com
    http:
      paths:
      - path: /
        pathType: Prefix
        backend:
          service:
            name: warehouse-service
            port:
              number: 80
4/Find the DNS name under Application Gateway > Frontend IP Configuration:
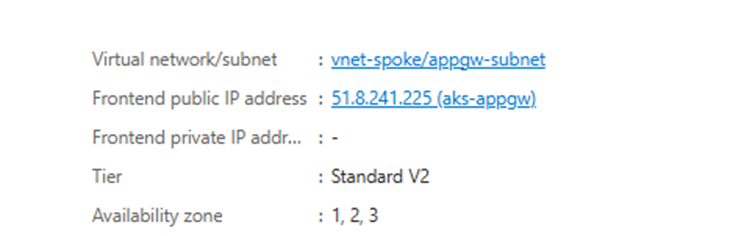
5/Access your app at: http://frontend IP
📦Conclusion: From Zero to Production-Ready AKS
Congratulations! 🎉 You’ve just walked through deploying a secure, scalable, and fully integrated AKS cluster—all within the Azure Portal and without touching a single AI-generated shortcut.
From designing a hub-and-spoke network, setting up private ACR pulls, and deploying web apps via Application Gateway Ingress Controller (AGIC) to managing internal services with Azure Load Balancer, you now have the blueprint for running production-grade Kubernetes on Azure with confidence.
Whether you’re building internal enterprise tools or internet-facing web apps, this architecture balances performance, security, and maintainability—and keeps you aligned with Azure’s best practices.
Next step? Try replicating this in your own environment. Adapt it, tweak it, and scale it.